Blog
/
Guides & Tutorials

Building Discord apps quickly with Gadget: A step-by-step tutorial
Published
November 22, 2023
Last updated
October 17, 2024
Go through Discord’s “Getting Started” guide using Gadget to build your first Discord bot

Discord apps are a great way to keep your community fun and engaging. You can create minigames for your server, or tools to generate inspiration, or even provide educational resources. 

Recently, Discord announced support for Premium App Subscriptions, a new feature that will allow developers the option to monetize their Discord apps natively on the platform, instead of through third party processors and websites. So what better time to start learning about building Discord apps?

In this tutorial, we’ll walk you through the process of building and hosting a Discord app using Gadget’s hosted and scaled Node backend, Postgres database, and auto-generated CRUD API for custom data models. By the end, you'll have a production-ready variation of a Rock, Paper, Scissors game that integrates seamlessly into your Discord server.

If you prefer a visual aid, you can also follow along with our video tutorial.

Step 1: Creating Your Discord App

Throughout this tutorial, we’ll be referencing Discord’s “Getting Started” app guide. To help you get an understanding of the different ways Discord apps can be used, this app will explore the use of slash commands, send messages, and respond to component interactions.

Start by creating a new app in Discord. Once you give your app a name, you’ll be directed to your developer dashboard.

On the left menu, navigate to OAuth2 > URL Generator and select the necessary scopes and permissions. For this build, we’ll be using the <inline-code>bot<inline-code> scope, and the <inline-code>send messages<inline-code> permission. Copy the generated URL, open it in a new tab, and follow the steps to authorize your app and install it on your server.
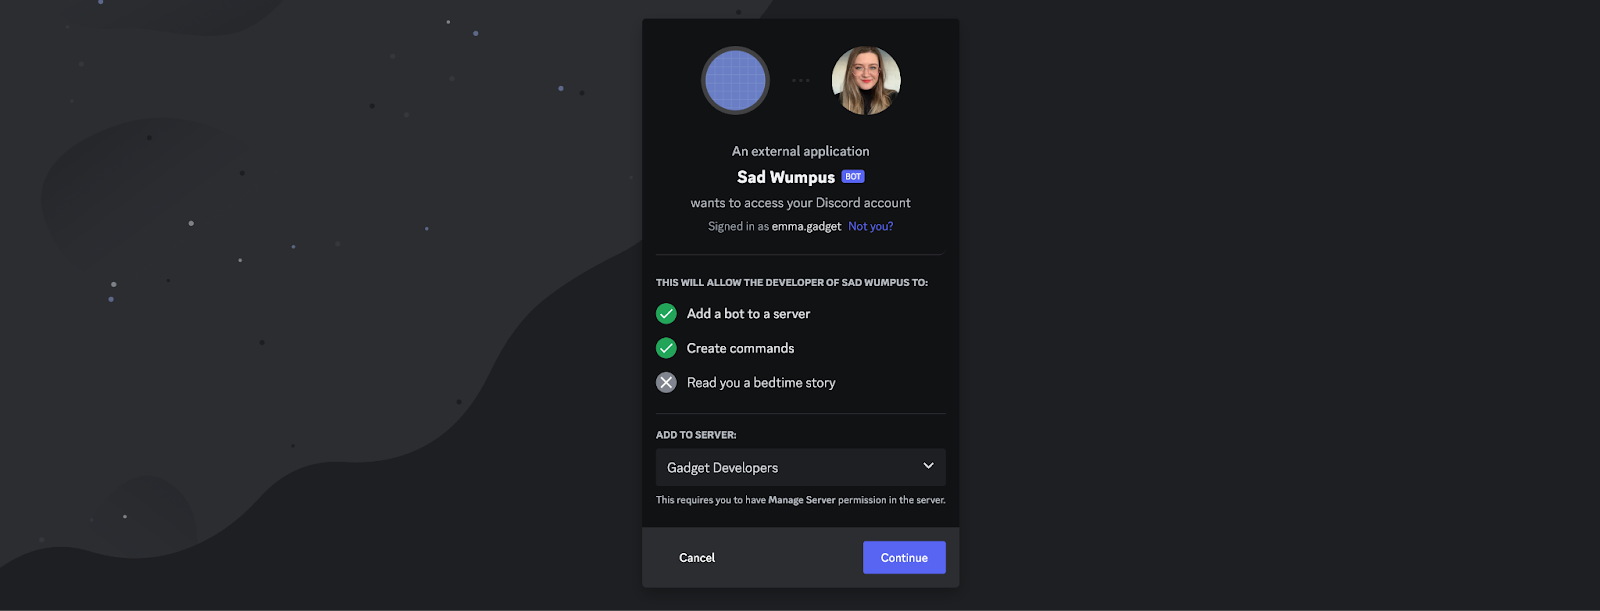
Give your new Discord app access to a server

Step 2: Running Your App with Gadget

Usually, Discord recommends using Glitch to host an app and get it up and running quickly. But due to its technical limitations, Glitch is typically not suited to production-grade apps. Gadget, on the other hand, auto-scales with your app, so you’re able to transition from prototype to production app without starting a new project.

If you haven’t used Gadget before, don’t worry — you can spin up a project with development and production environments for free.

Gadget has a forkable Discord app template ready to go, so head over to https://discord-getting-started.gadget.app/ and fork the project. All the code you need to run the project is already set up. This template includes a Node.js backend, CRUD API, and Postgres database, with the <inline-code>games<inline-code> model set up and ready to build. 

Note: If you want to build something more complex than the initial starter app, you can create and add new models as needed.

You will, however, need to set up some environment variables. In the Gadget project Settings, go to Environment Variables and paste the App ID and Public key from the General Information page of your Discord app into the PUBLIC_KEY and APP_ID variables for your Development environment. 
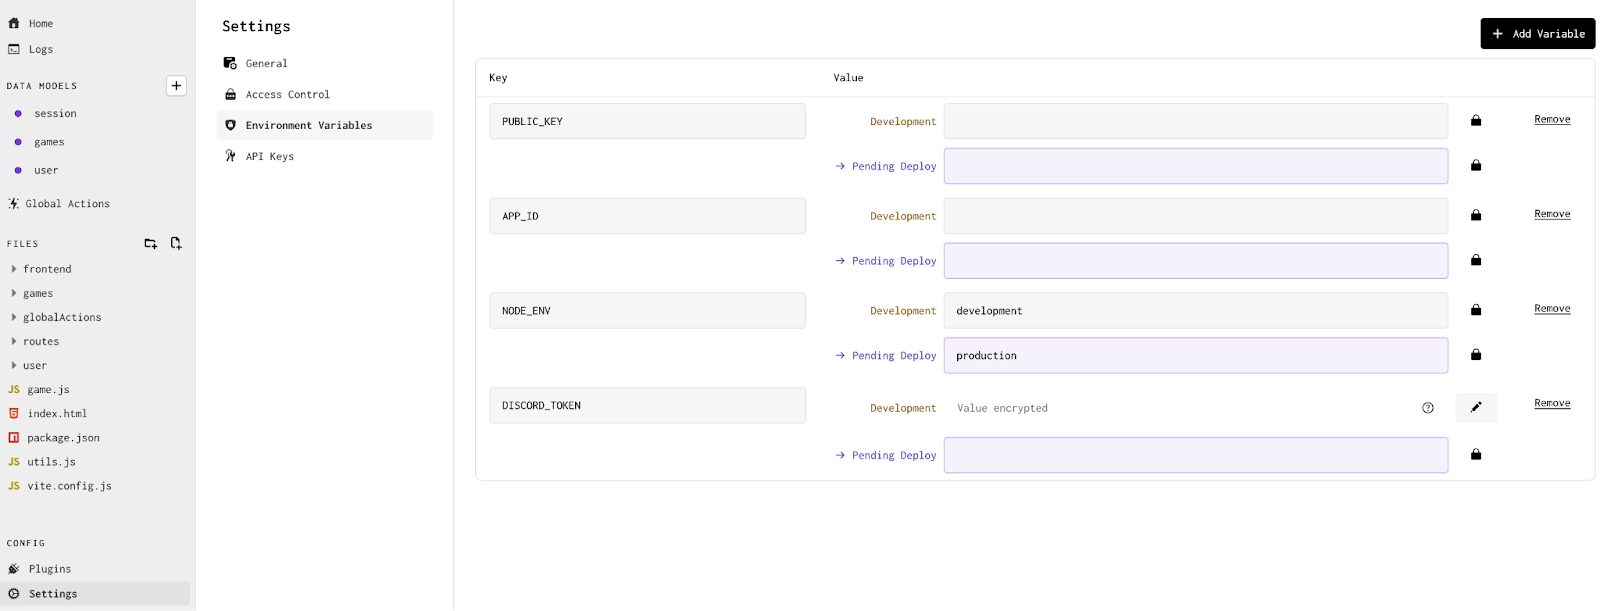
Make sure to update your Public Key, App ID, and Discord token

You’ll also need a Discord token. To do this, from your app in the Discord developer dashboard, navigate to the Bot tab and reset your bot’s token. Discord will automatically generate a new token for you. Copy and paste that into your app’s DISCORD_TOKEN environment variable, and click the lock icon to encrypt it.
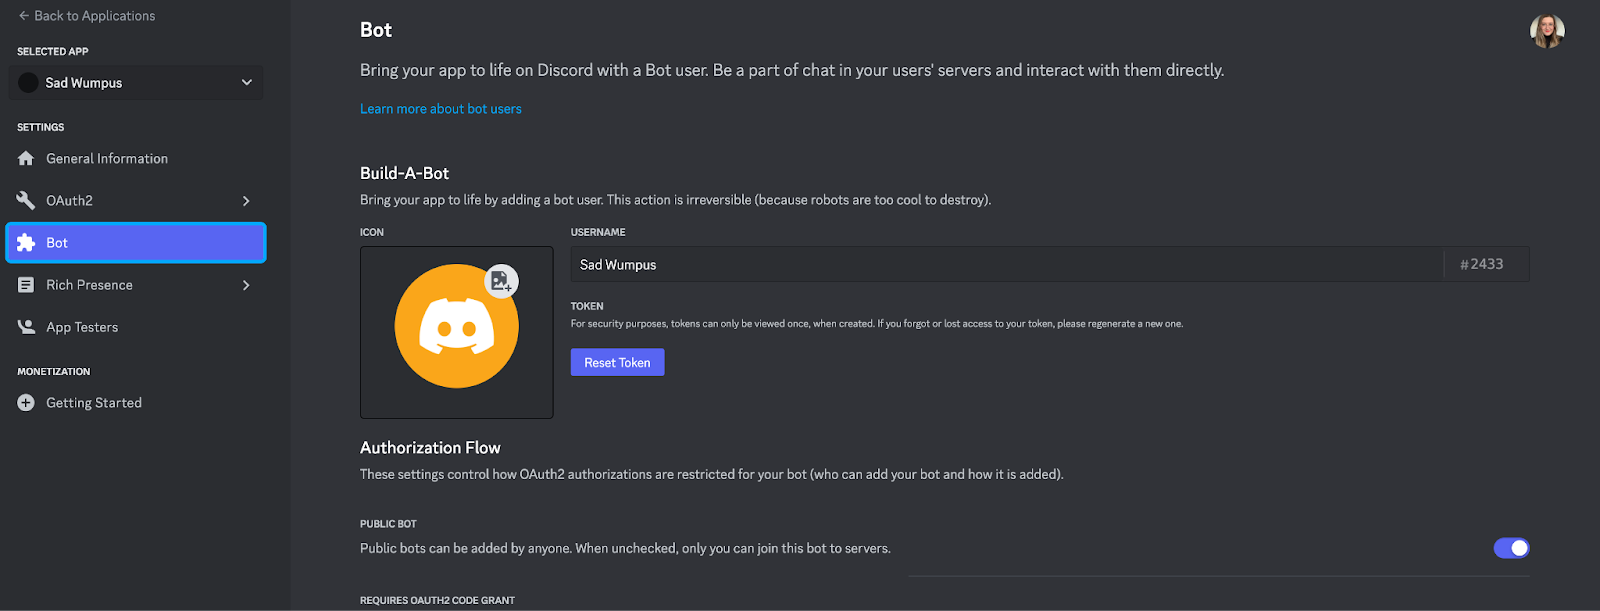
You can reset the Discord token from the Bot tab

Step 3: Handling Interactivity

The Discord getting started app template we forked in Gadget comes with an HTTP route preconfigured. If you need to customize it at all, you can find it in the <inline-code>routes/POST-interactions.js<inline-code> file. This is what we will use to handle all of the incoming activity from Discord. 

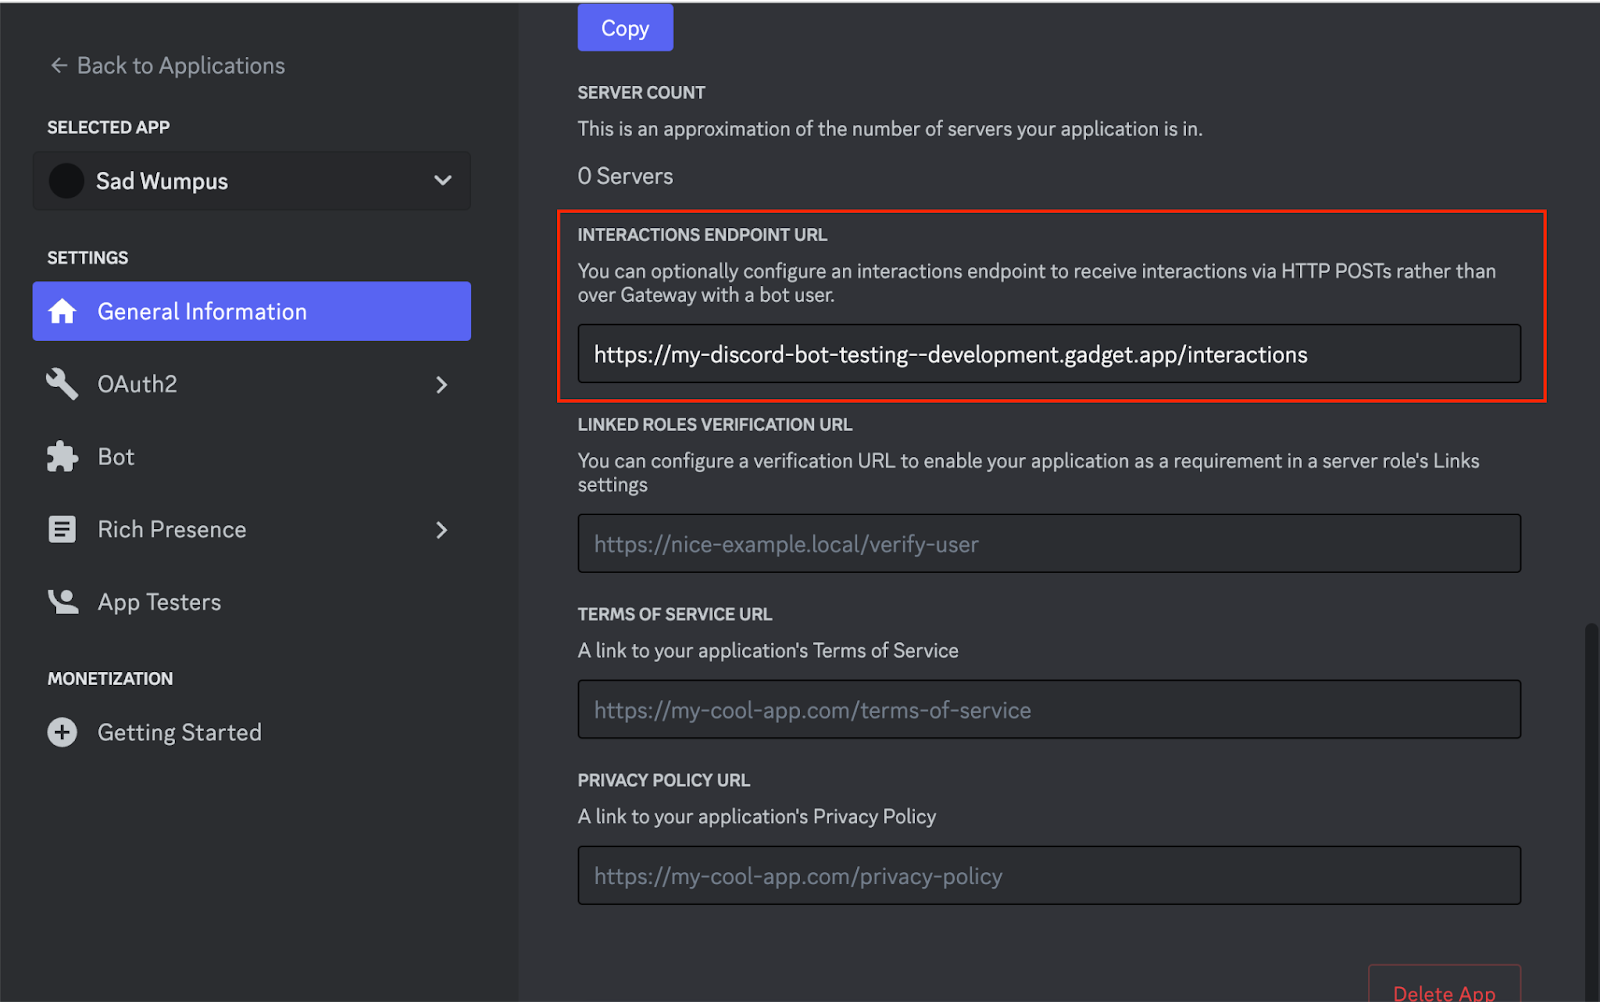
To set your interactions endpoint URL, input <inline-code><your-gadget-url>/interactions<inline-code> into the Interactions Endpoint URL field on the General Information page of your Discord developer dashboard. Make sure you use the URL for your development environment! To get this URL, you can go to your Gadget app’s Home page and click the copy button next to the provided URL.

Make sure to insert the correct endpoint URL

Step 4: Adding Message Components

The final step involves populating the message components and adding them to your Discord server. To do this, you’re going to need to set up a Global Action in your Gadget app. You’ll be using the <inline-code>registerCommands<inline-code> action to install both the <inline-code>test<inline-code> and <inline-code>challenge<inline-code> commands onto your discord server.

If you click Run Action, you can test the Global Action in the API playground before confirming that the <inline-code>/test<inline-code> and <inline-code>/challenge<inline-code> commands are working correctly on your Discord server.

Congratulations! You now have a fully functional Discord bot built on Gadget's production-grade infrastructure.

Why did we use Gadget instead of Glitch?

One significant advantage of Gadget is the Postgres database included with every project. If you wanted to see the game you just played to test your app, you can find the specific record for it in your database. The <inline-code>game<inline-code> data model we used includes user ID, message ID, and the chosen object (rock, paper, or scissors).

Gadget also provides automatic CRUD actions for data models. In the case of the Rock, Paper, Scissors app, you can use these to store game records in the database.

If you want to deploy your app to production, all it takes is a click with Gadget. Simply copy over the environment variables from your development environment to the production version.

And just like that, you have a production-ready Discord app. 

If you have questions or want to connect with other developers, check out Gadget's documentation or join our Discord server. Happy coding!

Emma Hyde
Author
Riley Draward
Reviewer
Try Gadget
See the difference a full-stack development platform can make.
Create app

Building Discord apps quickly with Gadget: A step-by-step tutorial

Go through Discord’s “Getting Started” guide using Gadget to build your first Discord bot
Problem
Solution
Result

Discord apps are a great way to keep your community fun and engaging. You can create minigames for your server, or tools to generate inspiration, or even provide educational resources. 

Recently, Discord announced support for Premium App Subscriptions, a new feature that will allow developers the option to monetize their Discord apps natively on the platform, instead of through third party processors and websites. So what better time to start learning about building Discord apps?

In this tutorial, we’ll walk you through the process of building and hosting a Discord app using Gadget’s hosted and scaled Node backend, Postgres database, and auto-generated CRUD API for custom data models. By the end, you'll have a production-ready variation of a Rock, Paper, Scissors game that integrates seamlessly into your Discord server.

If you prefer a visual aid, you can also follow along with our video tutorial.

Step 1: Creating Your Discord App

Throughout this tutorial, we’ll be referencing Discord’s “Getting Started” app guide. To help you get an understanding of the different ways Discord apps can be used, this app will explore the use of slash commands, send messages, and respond to component interactions.

Start by creating a new app in Discord. Once you give your app a name, you’ll be directed to your developer dashboard.

On the left menu, navigate to OAuth2 > URL Generator and select the necessary scopes and permissions. For this build, we’ll be using the <inline-code>bot<inline-code> scope, and the <inline-code>send messages<inline-code> permission. Copy the generated URL, open it in a new tab, and follow the steps to authorize your app and install it on your server.

Give your new Discord app access to a server

Step 2: Running Your App with Gadget

Usually, Discord recommends using Glitch to host an app and get it up and running quickly. But due to its technical limitations, Glitch is typically not suited to production-grade apps. Gadget, on the other hand, auto-scales with your app, so you’re able to transition from prototype to production app without starting a new project.

If you haven’t used Gadget before, don’t worry — you can spin up a project with development and production environments for free.

Gadget has a forkable Discord app template ready to go, so head over to https://discord-getting-started.gadget.app/ and fork the project. All the code you need to run the project is already set up. This template includes a Node.js backend, CRUD API, and Postgres database, with the <inline-code>games<inline-code> model set up and ready to build. 

Note: If you want to build something more complex than the initial starter app, you can create and add new models as needed.

You will, however, need to set up some environment variables. In the Gadget project Settings, go to Environment Variables and paste the App ID and Public key from the General Information page of your Discord app into the PUBLIC_KEY and APP_ID variables for your Development environment. 

Make sure to update your Public Key, App ID, and Discord token

You’ll also need a Discord token. To do this, from your app in the Discord developer dashboard, navigate to the Bot tab and reset your bot’s token. Discord will automatically generate a new token for you. Copy and paste that into your app’s DISCORD_TOKEN environment variable, and click the lock icon to encrypt it.

You can reset the Discord token from the Bot tab

Step 3: Handling Interactivity

The Discord getting started app template we forked in Gadget comes with an HTTP route preconfigured. If you need to customize it at all, you can find it in the <inline-code>routes/POST-interactions.js<inline-code> file. This is what we will use to handle all of the incoming activity from Discord. 

To set your interactions endpoint URL, input <inline-code><your-gadget-url>/interactions<inline-code> into the Interactions Endpoint URL field on the General Information page of your Discord developer dashboard. Make sure you use the URL for your development environment! To get this URL, you can go to your Gadget app’s Home page and click the copy button next to the provided URL.

Make sure to insert the correct endpoint URL

Step 4: Adding Message Components

The final step involves populating the message components and adding them to your Discord server. To do this, you’re going to need to set up a Global Action in your Gadget app. You’ll be using the <inline-code>registerCommands<inline-code> action to install both the <inline-code>test<inline-code> and <inline-code>challenge<inline-code> commands onto your discord server.

If you click Run Action, you can test the Global Action in the API playground before confirming that the <inline-code>/test<inline-code> and <inline-code>/challenge<inline-code> commands are working correctly on your Discord server.

Congratulations! You now have a fully functional Discord bot built on Gadget's production-grade infrastructure.

Why did we use Gadget instead of Glitch?

One significant advantage of Gadget is the Postgres database included with every project. If you wanted to see the game you just played to test your app, you can find the specific record for it in your database. The <inline-code>game<inline-code> data model we used includes user ID, message ID, and the chosen object (rock, paper, or scissors).

Gadget also provides automatic CRUD actions for data models. In the case of the Rock, Paper, Scissors app, you can use these to store game records in the database.

If you want to deploy your app to production, all it takes is a click with Gadget. Simply copy over the environment variables from your development environment to the production version.

And just like that, you have a production-ready Discord app. 

If you have questions or want to connect with other developers, check out Gadget's documentation or join our Discord server. Happy coding!

Interested in learning more about Gadget?

Join leading agencies making the switch to Gadget and experience the difference a full-stack platform can make.