Building with Shopify customer account extensions
One of the most exciting features to come out of Shopify’s Winter 24 Editions is more insight into customer account extensibility. With this new Shopify extension type, developers are able to create apps that support a merchant’s customers’ experience. With a link from the merchant, customers will have access to the order index, order status, and profile pages without requiring any sign-in. Any changes or updates they make to their customer profile will be reflected in the Shopify admin without any action from the merchant.
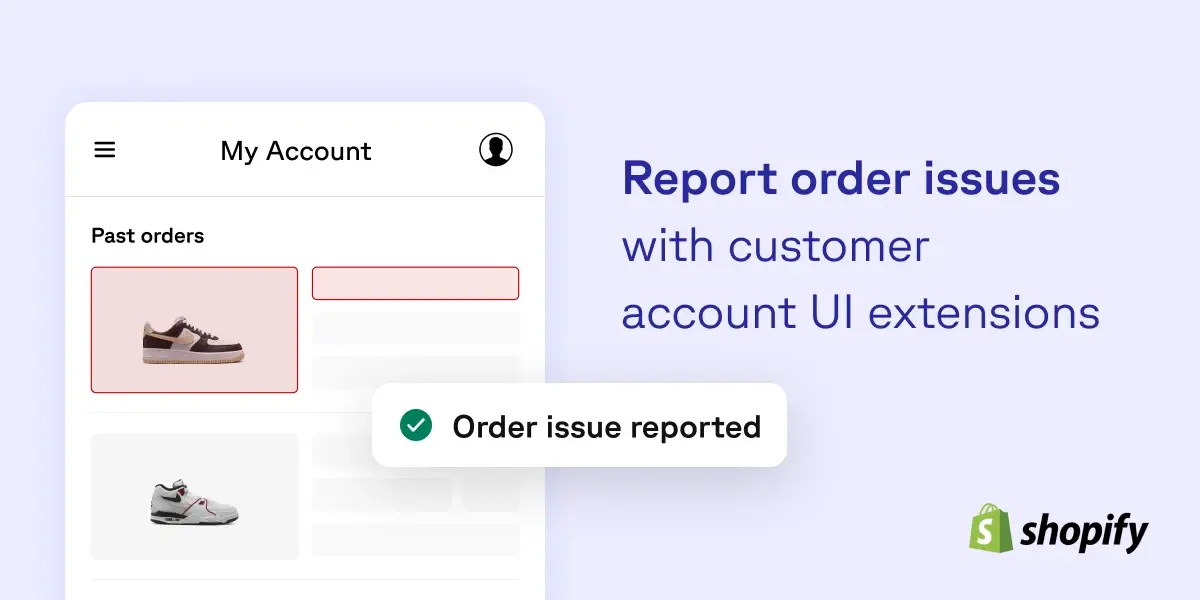
In this tutorial, we’ll build a customer account extension that allows customers to report problems with orders directly from the order status page. It’s important to note that this is only available on new customer accounts.
Pre-requisites
- Basic knowledge of JavaScript and React
- A Shopify Partner account
- Access to Gadget (some functionalities are in beta as of this writing)
- Familiarity with Node.js and React frontend development
Step 1: Set up your project and connect to Shopify
The first thing you’ll want to do is set up a new project in Gadget and connect it to Shopify. If you've never done this before, follow this quickstart. (Spoiler: in just 2 minutes you’ll have all the necessary data synced with your Gadget app)
For this build, we’re going to need read access to the Order and Customer API scopes, and the underlying Order and Customer data models. We also need to select the Customer account authentication option in the Customer section so that a merchant's customers can make secure requests to the Gadget backend.
Step 2: Request protected customer data and install on a store
For this build, it’s important that you request access to protected customer data, indicating that you require it for app functionality.
After this, you’ll want to install your app on a store. Once installed, to make sure everything is running correctly, we recommend creating a test order to confirm your customer and order data syncs to your Gadget database as expected.
Note: If you want to sync order data older than 60 days, you’ll need special permission from Shopify. There's a unique access scope you’ll need and a checkbox on the partner's dashboard that will allow you to do so.
Step 3: Build your custom data models
In order to provide buyers with different options that they can report as a problem, we need to create a custom model. To allow customers to quickly submit issues and help merchants easily resolve them, we’re going to provide a list of options instead of allowing for freeform input.
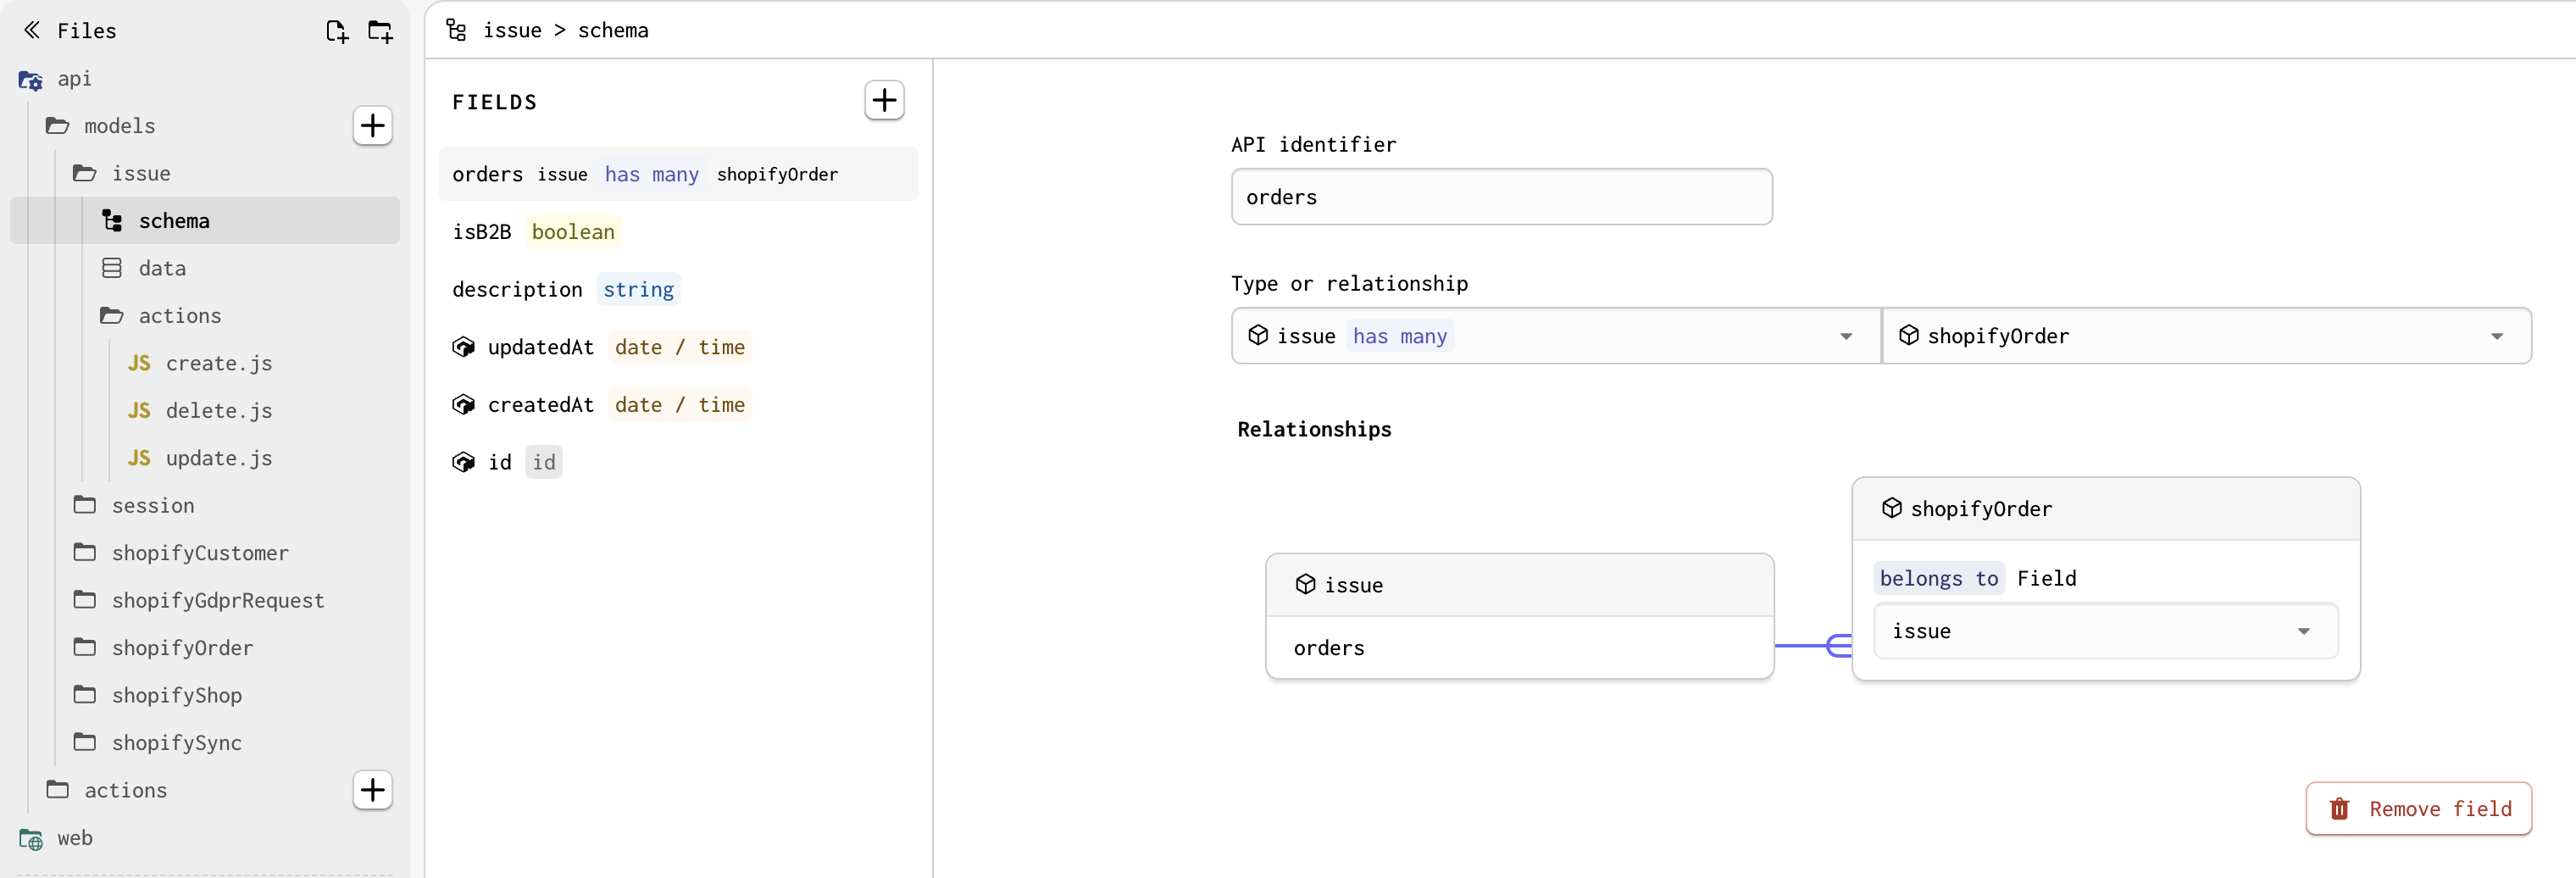
- Create a custom data model in Gadget named <inline-code>issue<inline-code>.
- Because issues need descriptions, we’re going to add a string field called <inline-code>description<inline-code> and make this a required field using the included validation option. Merchants won’t be able to create an issue without a description.
- For B2B customers, we want to take advantage of that extra B2B layer that is baked right into Shopify's customer account extensions. To do this, we’ll create a boolean field called <inline-code>isB2B<inline-code>, and when true, we’ll offer a separate subset of issues unique to B2B customers.
- Finally, we want to relate reported issues back to the order a customer is having problems with. To do that, we’ll create one more field for <inline-code>orders<inline-code> as a <inline-code>hasMany<inline-code> relationship with <inline-code>shopifyOrder<inline-code>, then set the relationship under <inline-code>belongs to<inline-code> to be <inline-code>issue<inline-code>. You should now be able to see it on the <inline-code>shopifyOrder<inline-code> model.
Step 4: Set up your backend logic
Next, we’re going to build some backend logic so that when a customer selects an issue with one of our orders, our extension will go ahead and relate the issue to the actual order in our database.
Gadget automatically generates a CRUD API for your app, and by default gives you create, update, and delete actions, as well as a read API, detailed in your app’s API docs. Each action comes with a code file, so you can edit and change them as needed. Actions have two main functions: <inline-code>run<inline-code> and <inline-code>onSuccess<inline-code>. The <inline-code>run<inline-code> function is typically useful for database operations, and <inline-code>onSuccess<inline-code> is great for longer-running actions or side effects. For this extension, we’re going to create a <inline-code>custom<inline-code> action.
This action will allow us to run a custom operation on an individual order. Add a new action called <inline-code>addIssue<inline-code> and set the action type to <inline-code>custom<inline-code>. We’ll add the following code to connect the issue the customer selects with an individual order.
In this code, all the <inline-code>run<inline-code> function is doing is saving the record to my database, preventing cross-shop data access, which means merchants and customers won't be able to see each other's data. So if you are building a public app, data tenancy is handled for Shopify models automatically by Gadget.
The <inline-code>onSuccess<inline-code> function, on the other hand, has changed. We’ve also defined a custom parameter for this custom action called <inline-code>issueId<inline-code>. This will allow us to pass the selected issue from the customer, and it’s being pulled from our parameters object.
We’ve included some comments within the code, which provide an example of what you can do when an issue is submitted, if you’d like to explore more.
Step 5: Modify access controls
Next, we’ll configure the necessary access control and roles for our extension, as we need to define them for both merchants and customers.
- Navigate to the Access control part of your Gadget app.
- We want to give merchants the ability to manage any submitted issues from an embedded UI, so we’re going to grant <inline-code>shopify-app-users<inline-code> access to the <inline-code>issue<inline-code> data model’s <inline-code>read<inline-code>, <inline-code>create<inline-code>, and <inline-code>delete<inline-code> actions.
- Shoppers need to be able to read the available issues, so we grant the <inline-code>shopify-storefront-customers<inline-code> role <inline-code>read<inline-code> access on the <inline-code>issues<inline-code> model. We’ll also grant them permission to <inline-code>addIssue<inline-code> and <inline-code>read<inline-code> on the <inline-code>shopifyOrder<inline-code> model, so they can report problems with their orders, while being able to see if an issue has already been filed for a particular order.
Step 6: Create your embedded frontend
To allow merchants to manage these issues, we’ll need an embedded frontend.
To set up your frontend, copy and paste the following into <inline-code>web/routes/index.jsx<inline-code>.
With this, we’ve included an API client that will be unique to your app, and we are importing this into a couple sample pages, like <inline-code>routes/index.jsx<inline-code>. Because this is a React frontend, we can use state, state hooks, or any React hooks that we desire. We provide some useful React hooks for interacting with your Gadget app's API in the <inline-code>@gadgetinc/react/auto/polaris<inline-code> package — you can read more in our docs.
At this point, you’ll want to test that everything works, so go ahead and add a few options to your issues. Make sure to include one that is specific to B2B!
Step 7: Creating the customer account UI extension
We can set up our customer account UI extension inside our Gadget project. To do that, we need to use <inline-code>ggt<inline-code>, Gadget's CLI, to pull down our project locally. This means we can also use VSCode or our favourite local editor to build Gadget apps!
Instructions for setting up an extension within Gadget can be found in our guide.
It’s important to note, you do not want to create your extension as a new app. Instead, we’re going to connect to an existing app, specifically, the Partners app we’ve just spent all this time building.
For extension type, select Customer account UI and select JavaScript React as the language. Now, we should see the extension in our file, which means we can work on it in VSCode or your editor of choice.
In the generated code, you’ll find an extensions folder. You should have a <inline-code>shopify.extension.toml<inline-code> file, which you can use to change your extension settings, a <inline-code>package.json<inline-code> file, and in the <inline-code>src<inline-code> folder, you’ll find your actual extension code.
Go ahead and start your extension using <inline-code>yarn shopify app dev<inline-code> and select the same store you installed your app on earlier. Copy and paste the generated URLs to make sure everything runs in the customer account pages as expected.
We’re going to update our <inline-code>.toml<inline-code> file to include an additional menu action modal extension. This will add the widget, the UI, and the card that appears, when a customer needs to select an issue.
Your <inline-code>shopify.extension.toml<inline-code> file should look like this:
Make sure that the <inline-code>network_access<inline-code> flag is enabled and set to true, this will allow us to call our Gadget app’s API. An additional extension target, <inline-code>customer-account.order.action.render<inline-code> has also been added to the default <inline-code>toml<inline-code> config.
Lastly, we need to install our Gadget API client. Start by running <inline-code>yarn add @gadgetinc/shopify-extension @gadget-client/<your-app-slug><inline-code>. Make sure to replace <inline-code><your-app-slug><inline-code> with your app name! If you check out your extension code again, and look at <inline-code>package.json<inline-code>, you should see that your two Gadget packages are installed.
Step 8: Writing extension code
Now that our API client is installed, we can use it to build our extension.
Paste the following code into <inline-code>src/MenuActionExtension.jsx<inline-code>:
Once again, make sure to replace <inline-code><your-app-slug><inline-code> with your app name for the <inline-code>Client<inline-code> import.
This code uses the customer account API to check order fulfillment status and renders a button on the orders page if part of an order has been fulfilled.
It also uses <inline-code>@gadgetinc/shopify-extensions<inline-code> to register the session token with the API client so that requests will be granted the correct <inline-code>shopify-storefront-customers<inline-code> role for any requests made using the client.
Finally, create a new file <inline-code>src/MenuActionModelExtension.jsx<inline-code>. This is the modal that will open when the button from <inline-code>MenuActionExtension.jsx<inline-code> is clicked. Paste the following code:
For a final time, replace <inline-code><your-app-slug><inline-code> with your app slug.
This code renders a form and makes use of Gadget’s <inline-code>useActionForm<inline-code> hook to manage the selected state and call the <inline-code>addIssue<inline-code> action when a customer submits a problem.
You should be done writing code now. Time to test out our extension.
Step 9: Test and deploy
Run your app using <inline-code>yarn dev<inline-code> and follow the link in Shopify’s developer console back to the customer order page. Click on the Report a problem button to open the modal and select a problem for the order. Not seeing the button? Make sure one of your orders is at least partially fulfilled in the store admin.
Once you have reported a problem, you should see an <inline-code>issue<inline-code> stored on the record of the <inline-code>shopifyOrder<inline-code> data model for which you reported a problem.
That’s it! You've now built a Shopify app using Gadget that allows customers to report problems with their orders directly from the order status page. Extend the app by adding a Twilio or SendGrid integration to notify merchants of problems, or add a new page to the admin app that allows merchants to address any issues.
If you have questions or just want to talk about how awesome building Shopify extensions with Gadget is, you can always join our developer Discord.