Guide: Build a VAT Validation Shopify app with Gadget

For many European Shopify Merchants, VAT validation can be a headache. The European Union requires many businesses to collect and validate VAT IDs in order to sell to certain buyers or sell certain products. Proper VAT validation is crucial for ensuring compliance with tax regulations and avoiding potential penalties, but Shopify doesn’t offer VAT support out of the box, so merchants are required to ensure they collect and validate the tax IDs themselves.
With Shopify’s new focus on checkout UI extensions, it’s easy to create an app that collects VAT ID at checkout, and auto-validates it through an API the EU makes available. This guide will walk you through how to build a VAT Validation app with Gadget and the Shopify CLI.
We’ll use the Shopify CLI to create the checkout UI extension, and Gadget to verify the VAT numbers against the VS VAT NPM package provided by the European Union.
Requirements:
Before starting this guide you need the following:
→ A Shopify Partners account
→ A development store with checkout extensibility developer preview enabled
Create your Checkout Extension
The first thing you need to do is run the Shopify CLI app creation command, which will prompt a series of questions before creating your checkout UI extension. Choose a name for your project and select the Node template library. Shopify will set up the dependencies and give you some instructions to follow as next steps.
Start by running <inline-code>cd <your-app-name><inline-code.
Gadget handles a lot of the web and server-side of your project for you. Because of this, select the Start by adding your first extension option when prompted. This will give you an empty template you can add your extensions to.
Finally, run <inline-code>npm run shopify app generate extension<inline-code> in your terminal to add the checkout extension to your app. Fill out the terminal survey that comes up, selecting Checkout UI as the extension type. This also allows us to quickly create an app in the Shopify Partners dashboard. You may also be prompted to select which Shopify Partners account to use. Shopify will then ask you which store you want to install your app on. You must use a store that has Checkout Extensibility preview enabled in order to create a checkout UI extension.
Now we can open up VS Code (or your favourite editor!) to take a look at the project.
In the project root there will be a <inline-code>shopify.app.toml<inline-code> file. In the [access-scopes] section, add use_legacy_install_flow = true. In the terminal, run <inline-code>npm run shopify app config push<inline-code> to push this change to your Partners app. This will allow us to install our Gadget app and register the required API scopes.
Next, we use <inline-code>npm run dev<inline-code> to run the app locally.
Create a Gadget project and install it on a store
Next, you’ll want to set up a Gadget project and connect it to your Shopify test store. You can quickly create a new project in Gadget at gadget.new. Then you’ll want to connect your Gadget app to your Shopify App. You can follow along using our connection guides. Make sure you install your Gadget app on the same store selected for your Shopify CLI app!
When you select your scopes and models, make sure you give Read and Write access on the Orders Scopes.
Within the scope, you’ll want to select the Order model. Gadget will automatically generate the necessary tables and API endpoints in your backend, with an event pipeline that automatically synchronizes events from Shopify with the table.
The way our VAT Validation app will work is the VAT number will be stored in a metafield on the order record it belongs to. Gadget will fetch the Order data, and we’ll need both the VAT number and country code to submit to the API verification tool, which are stored on the Order model.
We’ll read the Order data to fetch the information from the checkout and subsequently send it to a third party for validation, and then we’ll write the results of whether the VAT number is valid or invalid in the form of a tag.
If you plan on submitting your VAT validation app to the store, our app will be accessing Personal Identifiable Information (PII) data through the order webhooks, and so you’ll need to fill out the protected data access form. For working in development though, you’ll just need to select the App Functionality option.
Finally, you can install your app on your test store. If you go to the Connections → Shop Installs page in Gadget and click the Sync button, all of the order data from the last 60 days will automatically be synced back to your database.
Add a field to checkout
Next, we tell Shopify where our new field will appear in the checkout. In the extensions folder, you should be able to find the <inline-code>shopify.ui.extension.toml<inline-code> file.
We’ll place the new field just above the country. Change the checkout extension mount point to purchase.checkout.delivery-address.render-before, and make sure in <inline-code>src/Checkout.jsx<inline-code> it’s changed as well.
Next, we’ll replace Shopify’s source page with our own by opening up <inline-code>extensions/<extension-name>/src/Checkout.jsx<inline-code>, to paste the following code:
In this code, we’re using Shopify’s ui extensions library, which provides us with the UI components and React hooks we need to update the metafield.
Since there is no VAT ID metafield on Shopify already, we need to create one. So we give the metafield a namespace and key, and then update that field using the <inline-code>updateMetafield<inline-code> React hook.
In order to make the dev server aware of the new extension, open up the terminal again to run <inline-code>npm run dev<inline-code> and get the dev server going. If your app is already running, make sure to stop and restart it.
At this point, we’re able to preview our checkout extension in the Shopify Developer Console by using the link provided in the Shopify CLI.
You should see the VAT field on your checkout when you go to the preview. Before you complete a checkout test, let's get Gadget listening for this metafield. Head back to the Gadget editor, and navigate to the <inline-code>shopifyOrder<inline-code> model.
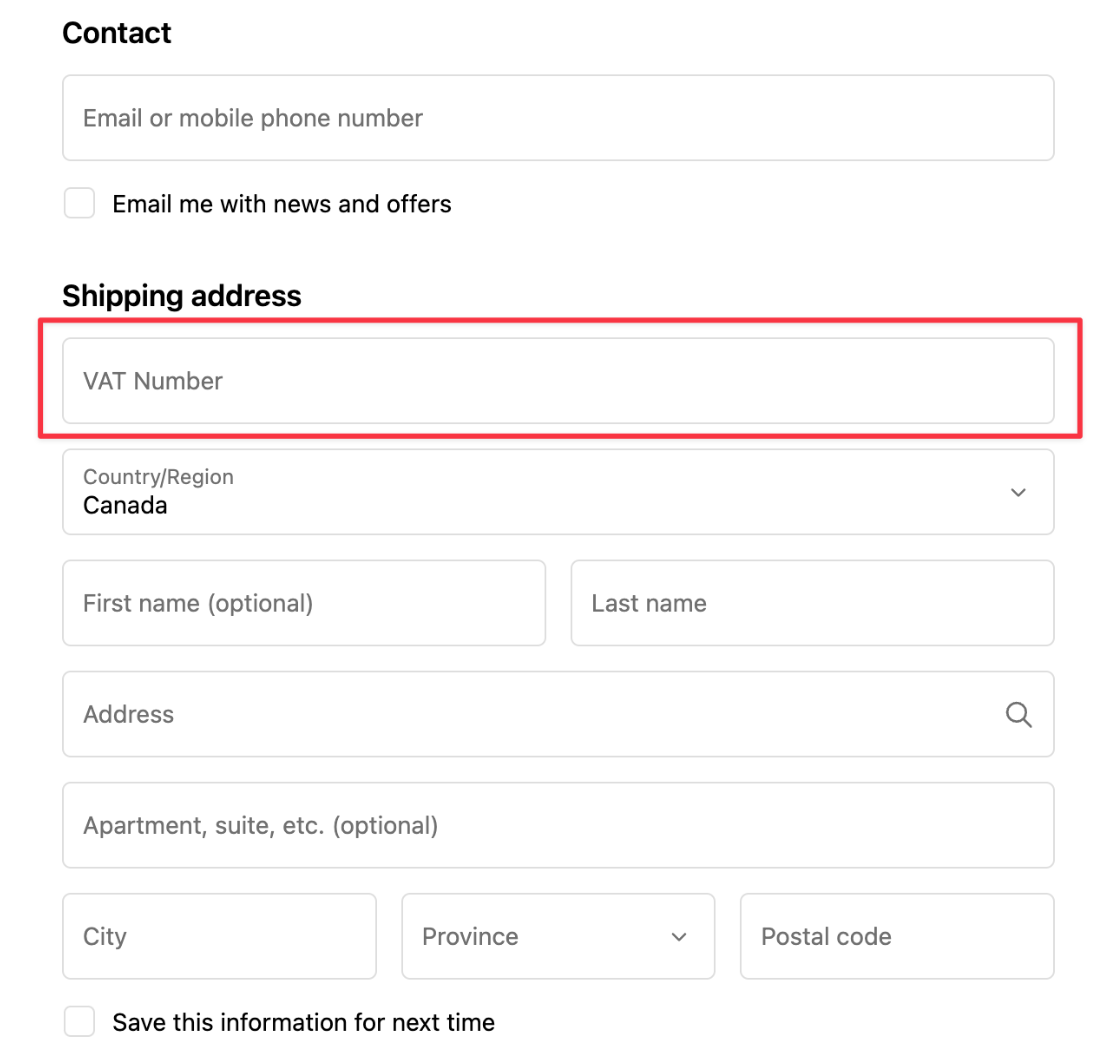
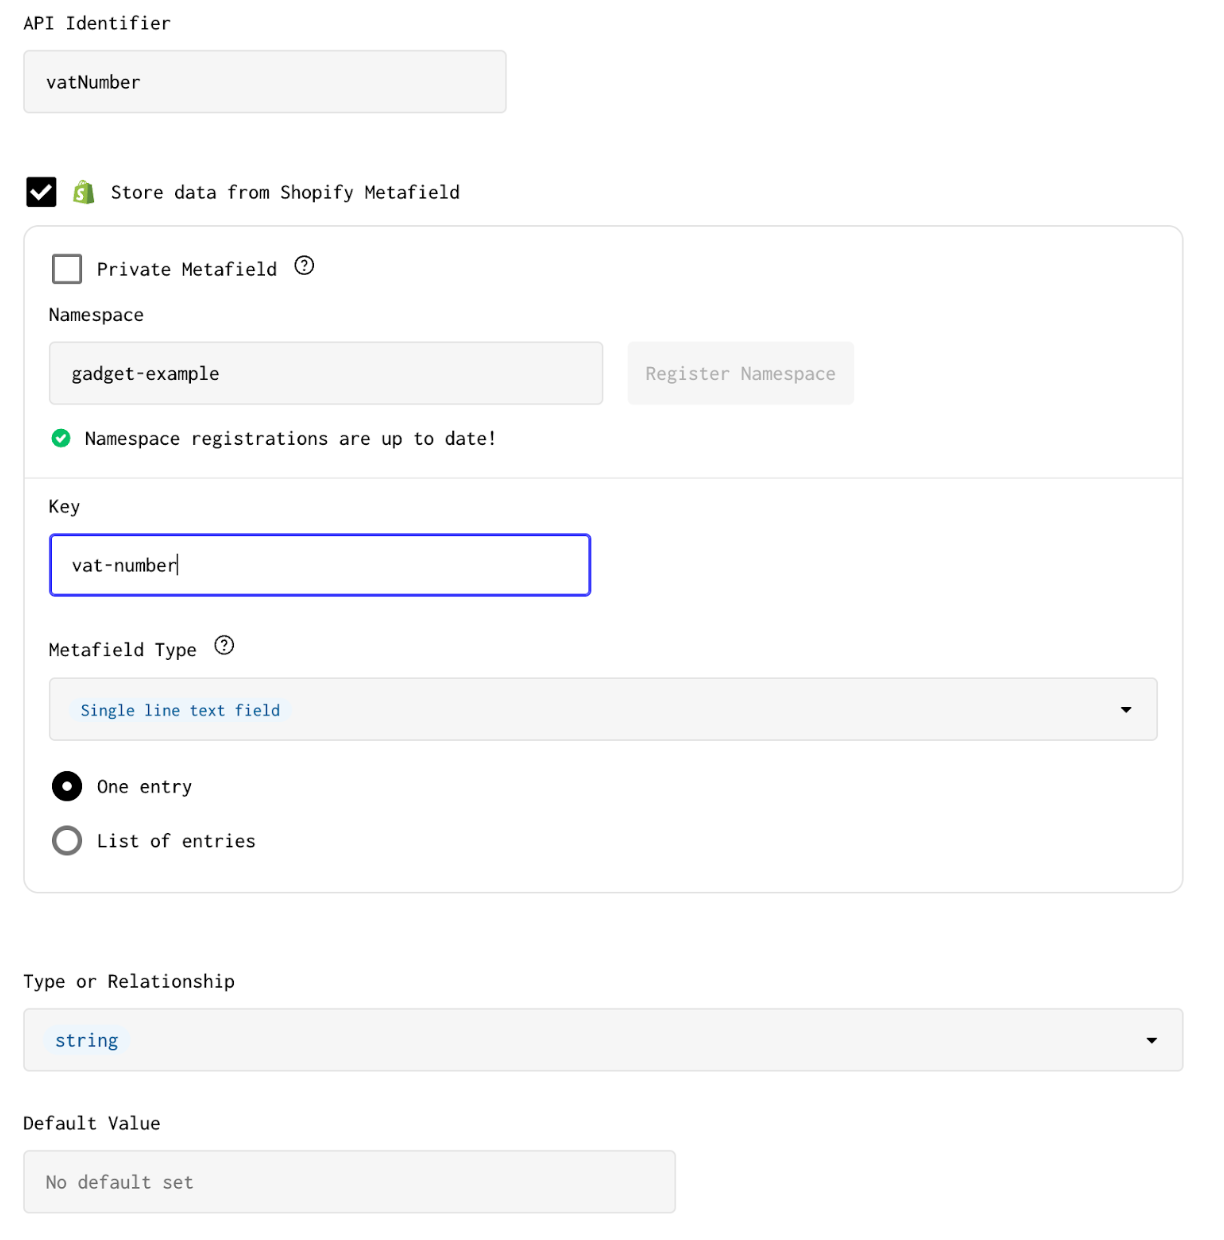
Because Shopify does not place the metafields of a record on the record resource, we’re going to add a new field for <inline-code>vatNumber<inline-code> and make it a <inline-code>String<inline-code> type.
Check the Store data from a Shopify Metafield box, and fill in details the Namespace with <inline-code>gadget-example<inline-code> and the Key with <inline-code>vat-number<inline-code>. Don’t forget to click the Register Namespace button for your metafield!
Now, it’s time to put your extension to the test. Go back to the Shopify Developer Console preview and submit an order that includes a VAT Number and complete the checkout. To make sure everything is running correctly, head back to Gadget and in the shopifyOrder’s Data viewer, check that the VAT number has been filled out on the shopifyOrder model.
Set up the VAT validation
Now we want to have Gadget validate submitted VAT numbers with the EU's API, and tag orders if they are valid or invalid.
Add the VIES-VAT npm package to your application by running <inline-code>yarn add vies-vat<inline-code> or by using <inline-code>package.json<inline-code> and hitting the run yarn button.
We’re going to adjust the Create Action by adding a serverless function so that every time an order webhook comes in, Gadget sends the country code and the VAT number to this service and returns with either valid or invalid, which we will store in a tag.
Replace the code file for the <inline-code>shopifyOrder/create.js<inline-code> file with the snippet below:
Finally, we’re ready to test our validator. Head back to the Shopify Developer Console preview and submit an order through the sandbox, including a VAT Number, and complete the checkout with both an invalid and valid VAT number. You should see the <inline-code>vat-invalid<inline-code> and <inline-code>vat-valid<inline-code> tags show up in the Gadget logs and in the Shopify admin.


Some things to note:
If you need to change which dev store you are running against, you need to run <inline-code>npm run dev -- --reset<inline-code> to switch which store the CLI will generate preview links for.
If you restart <inline-code>npm run dev<inline-code> for whatever reason, your old Shopify Dev Console will stop working silently. You’ll need to re-open the new link that the Shopify CLI spits out each time you run <inline-code>npm run dev<inline-code>. If you create a new extension, you need to restart the dev server.
If you have any questions about the tutorial or just want to connect with other developers working with Gadget, you can join our community Discord.