How to: Build a blog with built-in Google authentication
.png)
In this tutorial, we will build a simple blog application with a built-in Google authentication system. Our blog will have two sections: a public section where readers can view published blog posts and a private section where authors can create and publish new blog posts. Gadget will handle all parts of our application stack, including the database, backend API, and React frontend.
Let's get started!
Step 1: Create a new application
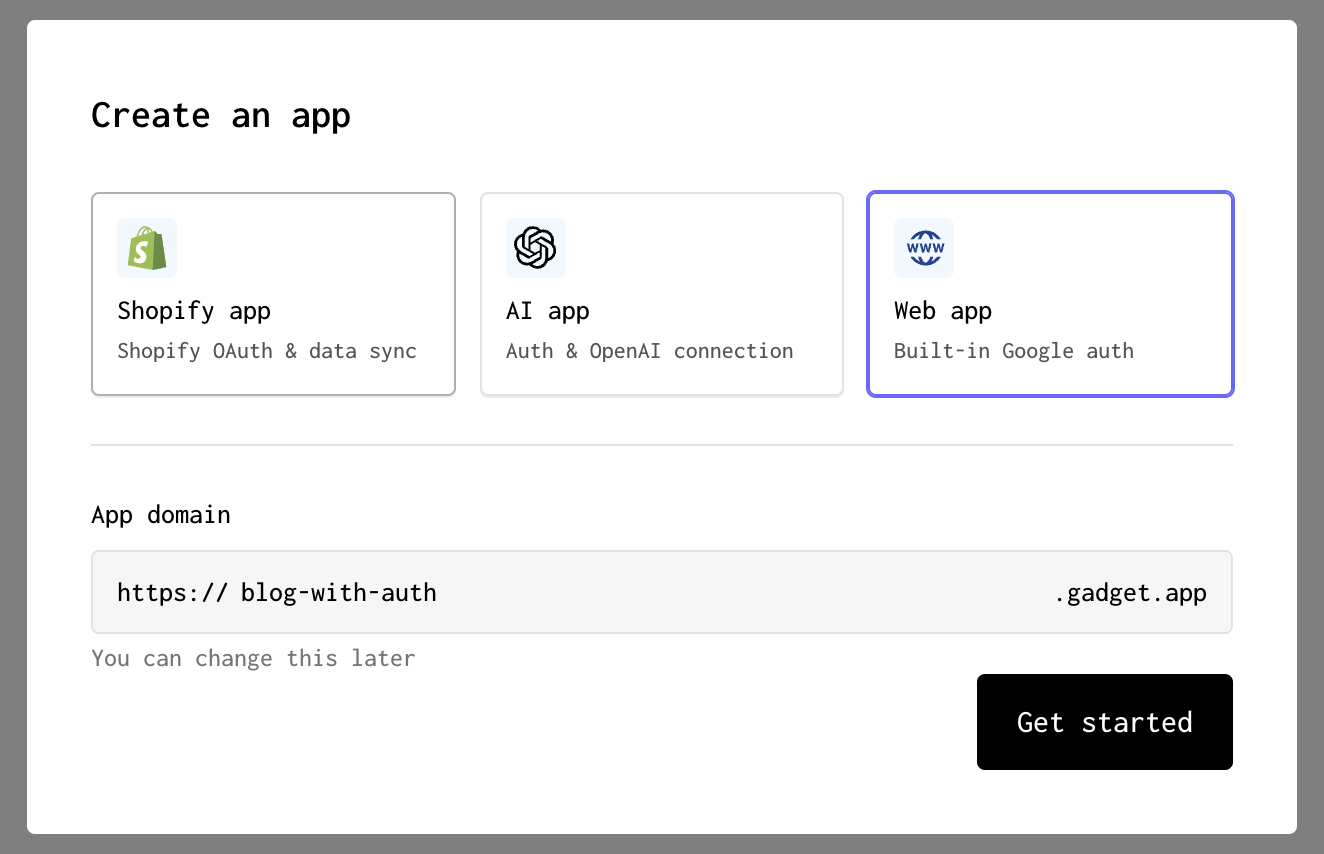
Head over to gadget.new to create a new Gadget app! You will have 3 choices for app templates - for this tutorial, we can use the Web app template that comes with built-in authentication.
Once the new Gadget app is created, move on to Step 2.
Step 2: Create a new model
The first thing we can tackle is creating a model to represent our blog posts and store blog post data in our database.
Our blog's schema is going to need a post model where each record represents a blog post. To create the post model click on the + icon to the right of Data Models and name the model <inline-code>post<inline-code>.
Every model in Gadget comes with a set of non-configurable system fields:
- <inline-code>id<inline-code> for identifying the record with an automatically assigned unique number
- <inline-code>createdAt<inline-code> and <inline-code>updatedAt<inline-code> for tracking when the record was created and last updated.
Add fields
Let's teach Gadget that beyond these system fields, our blog posts have additional attributes. We can do this by adding fields.
- Click on the + button at the top of the list of FIELDS
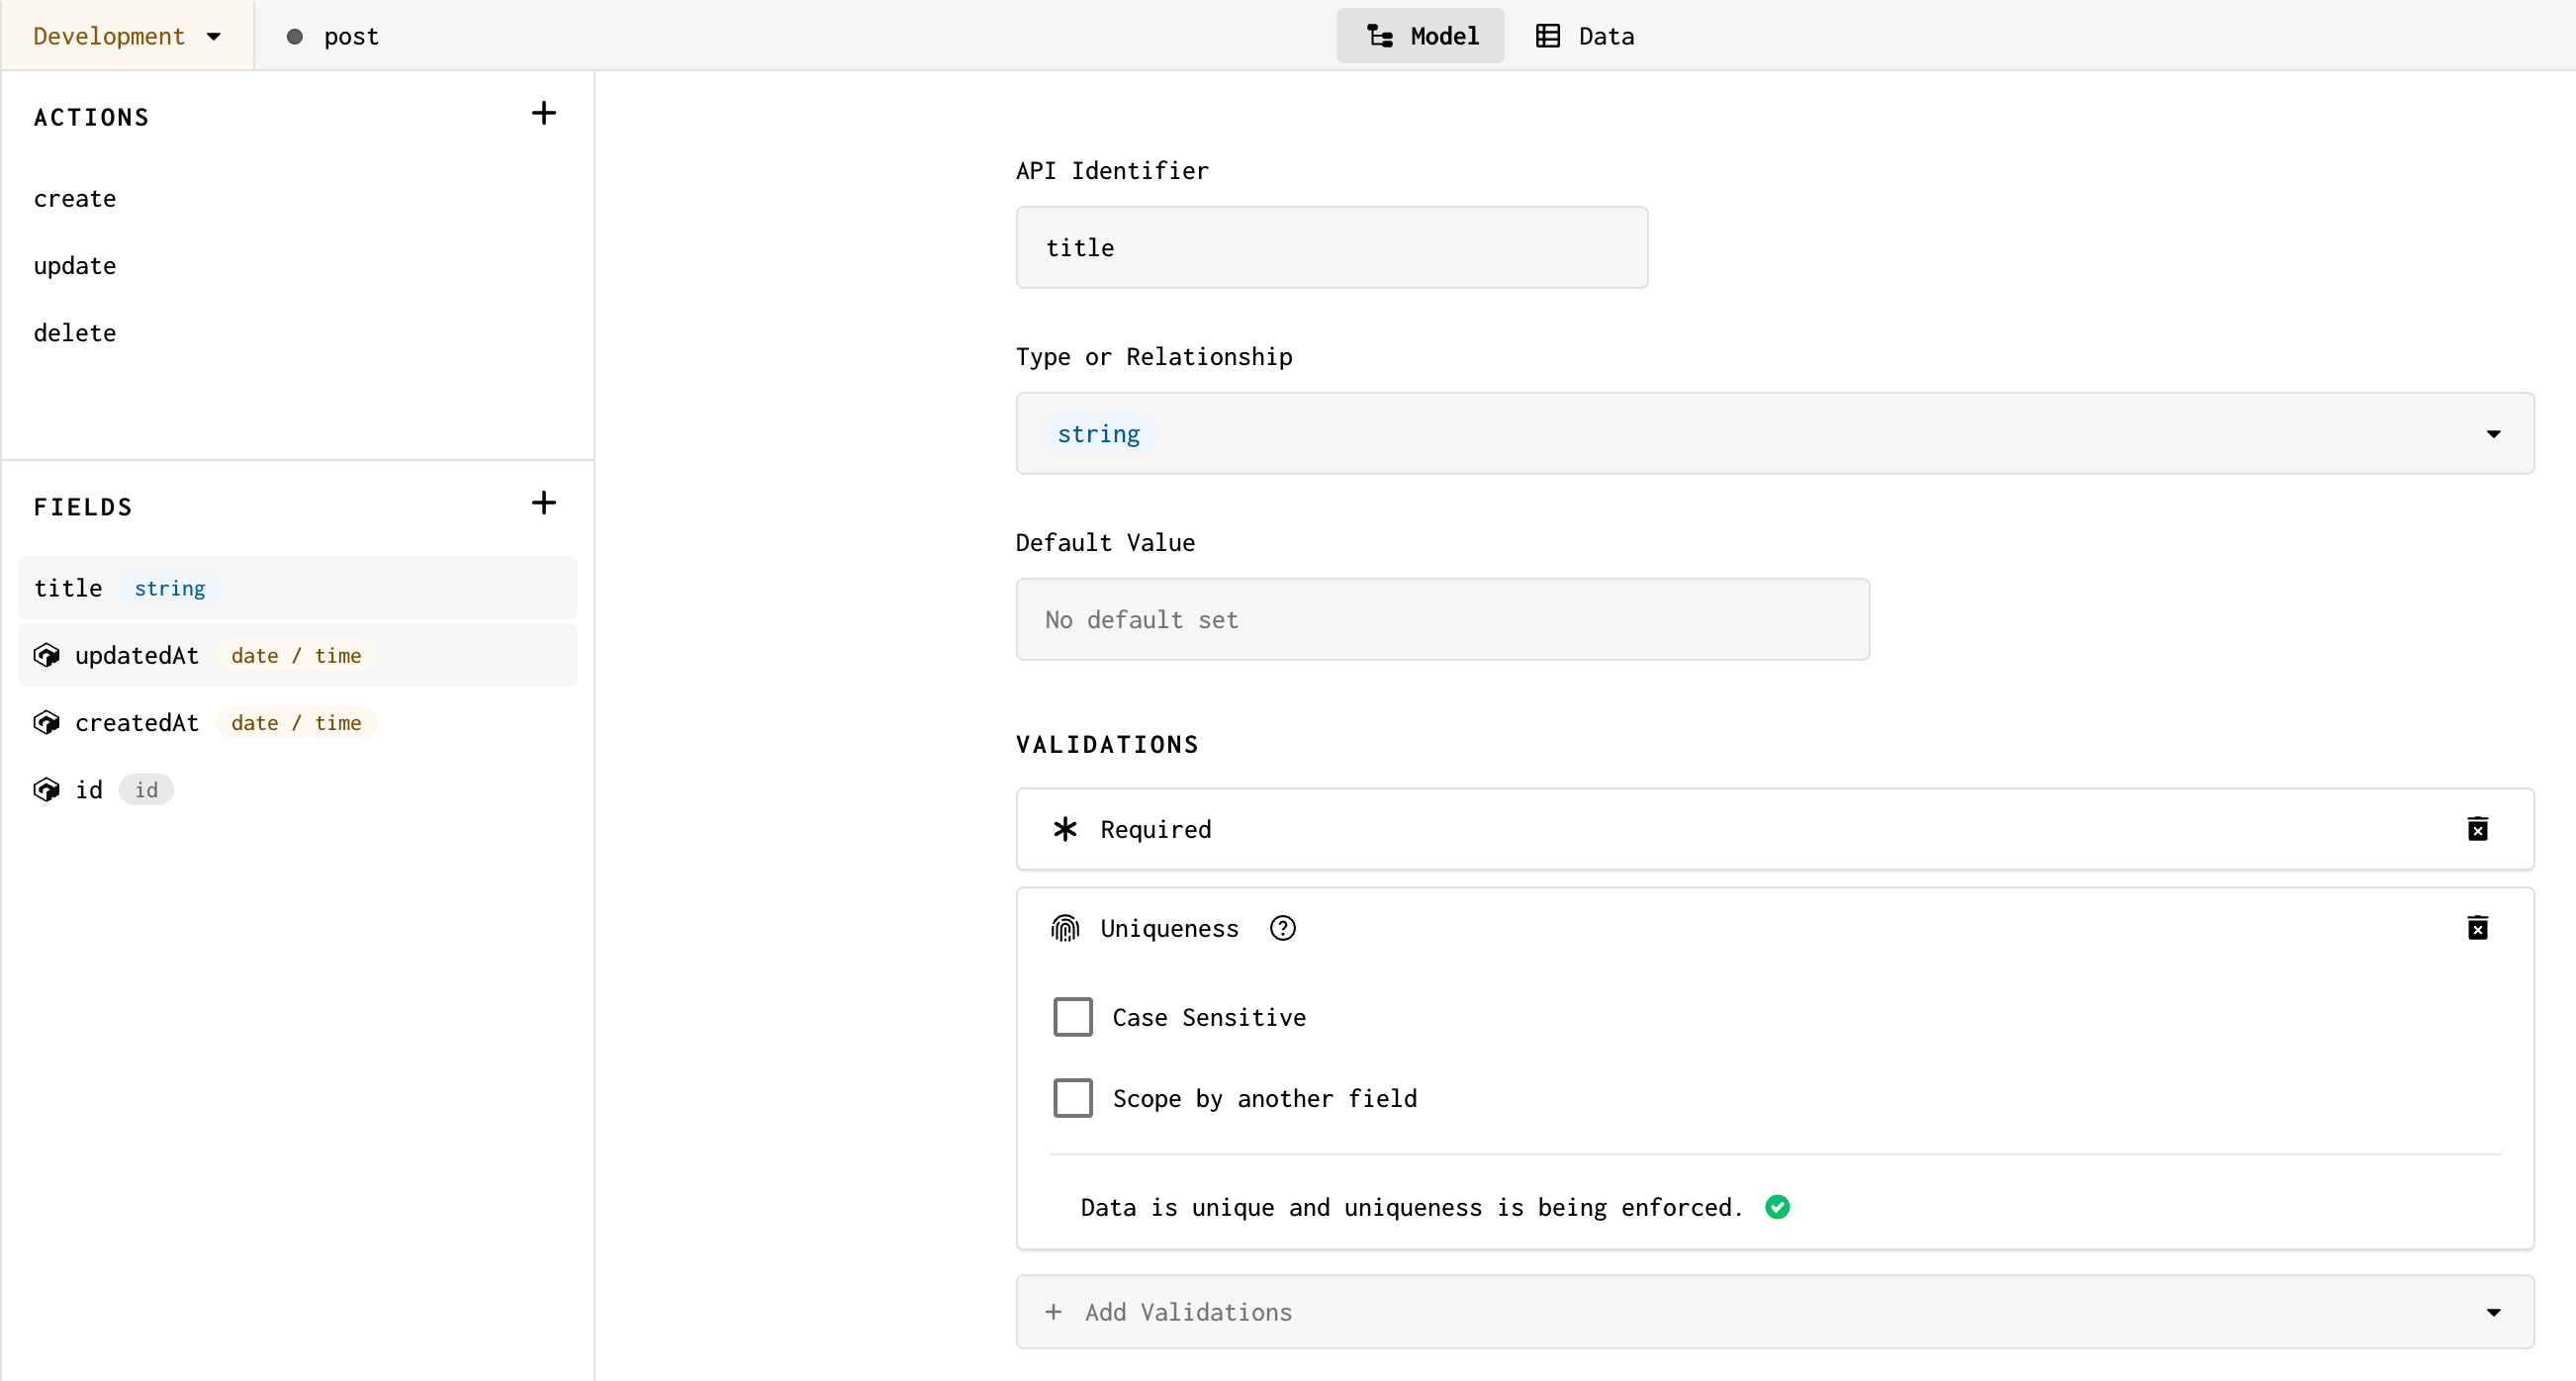
- Name the new field <inline-code>title<inline-code>
- Set the field type to <inline-code>string<inline-code>
Now, each blog post will have a title value stored in this field.
Finally, let's add a couple of validations to this field.
- In the Validations section, we can require every blog post to have a title by adding a Required validation
- Also add a Uniqueness validation to ensure that none of our posts use duplicate titles
Once finished, our title field should look like this:
Let's add some more fields to our post model to store the blog content, and published state:
- Add a new field with the API identifier <inline-code>content<inline-code> and a field type of <inline-code>rich text<inline-code>. This field will store the body of each blog post
- Add a new field with the API identifier <inline-code>isPublished<inline-code> and a field type of <inline-code>boolean<inline-code>. This field will store the published state of each blog post. Set the default value to False so that new blog posts are not published by default
Add a relationship
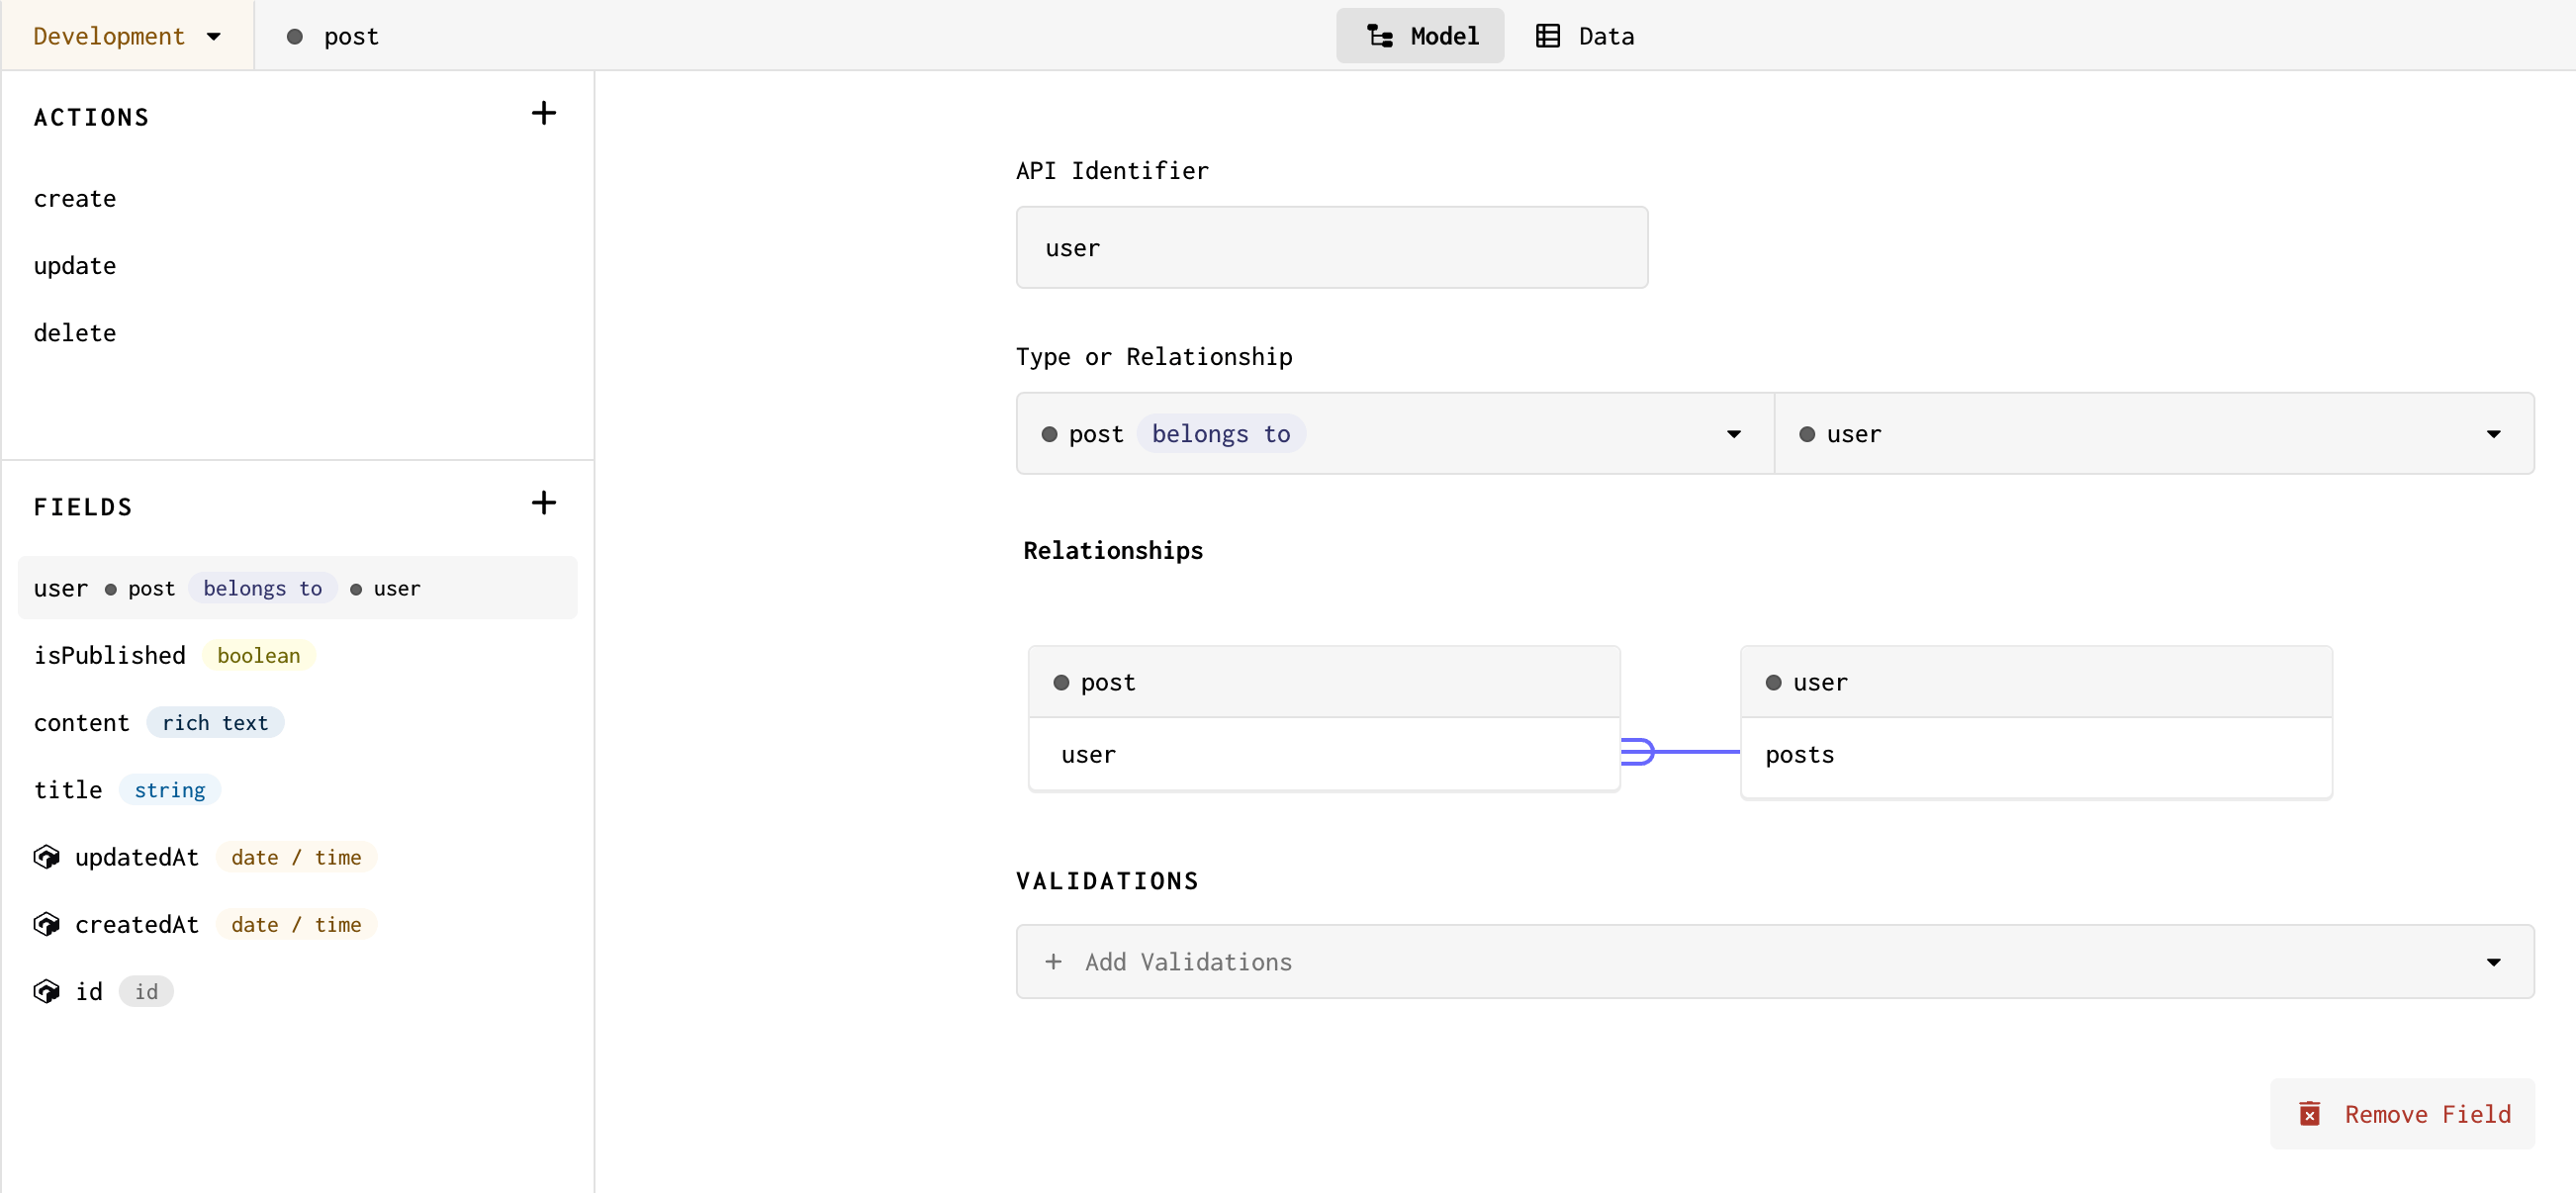
Finally, let's keep track of what user wrote each blog post by adding a relationship field to post. Relationships allow us to model data in a normalized fashion, so we can create relationships between models that are otherwise unrelated to each other. Like foreign keys in SQL, one model receives and stores the id in its data to set up the relationship.
When we selected the Web app blog post template, Gadget created a user model for us to store information about our users. We can use this model to store information about the authors of our blog posts. Let's create a relationship between the post and user models.
One user can write many blog posts, so we need a one-to-many relationship where user has many posts:
- Add a new field with the API identifier <inline-code>user<inline-code> and make the field a <inline-code>belongs to<inline-code> relationship. This field will store the author of each blog post
- Select the <inline-code>user<inline-code> model in the relationship widget that appears. This will create a relationship between the <inline-code>post<inline-code> and <inline-code>user<inline-code> models
- We are prompted to select the inverse relationship on the user model. Select the posts field on the user model so that user has many posts
The relationship should look like this:
You are done with data modeling! Now we move on to set our backend API permissions.
Step 3: Actions and API permissions
As we've been building our model and adding fields, Gadget has been automatically generating a set of actions for us. Actions are the API endpoints that we can use to create, read, update, and delete records in our database. We will use this generated CRUD API to build our blog. These actions can be found in the ACTIONS panel above the FIELDS when viewing a model.
But before we start building our frontend, we need to make sure we have the correct permissions set for different types of users. We want to make sure that only signed-in users can create and publish blog posts, and that anyone can read published blog posts.
- Click on Settings in the left navigation bar
- Click Roles & Permissions nested under Settings
By default, users who use Gadget's built-in authentication will be assigned the <inline-code>signed-in<inline-code> role. This is where we can configure what actions users with this role can perform. We also have an <inline-code>unauthenticated<inline-code> role that we can configure for users who are not signed in. These roles do not have permissions to custom model actions by default, so we will need to add permissions to be able to create, update, and read blog posts.
Start by granting <inline-code>unauthenticated<inline-code> users <inline-code>read<inline-code> permission on the <inline-code>post<inline-code> model. This will allow anyone to read published blog posts:
- Click the checkbox for the <inline-code>read<inline-code> action in the <inline-code>post<inline-code> model under the <inline-code>unauthenticated<inline-code> role
Now anyone will be able to read published posts!
Let's update the <inline-code>signed-in<inline-code> role to allow users to create and <inline-code>update<inline-code> blog posts:
- Click the checkbox for the <inline-code>read<inline-code>, <inline-code>create<inline-code>, and <inline-code>update<inline-code> actions in the post model under the <signed-in role
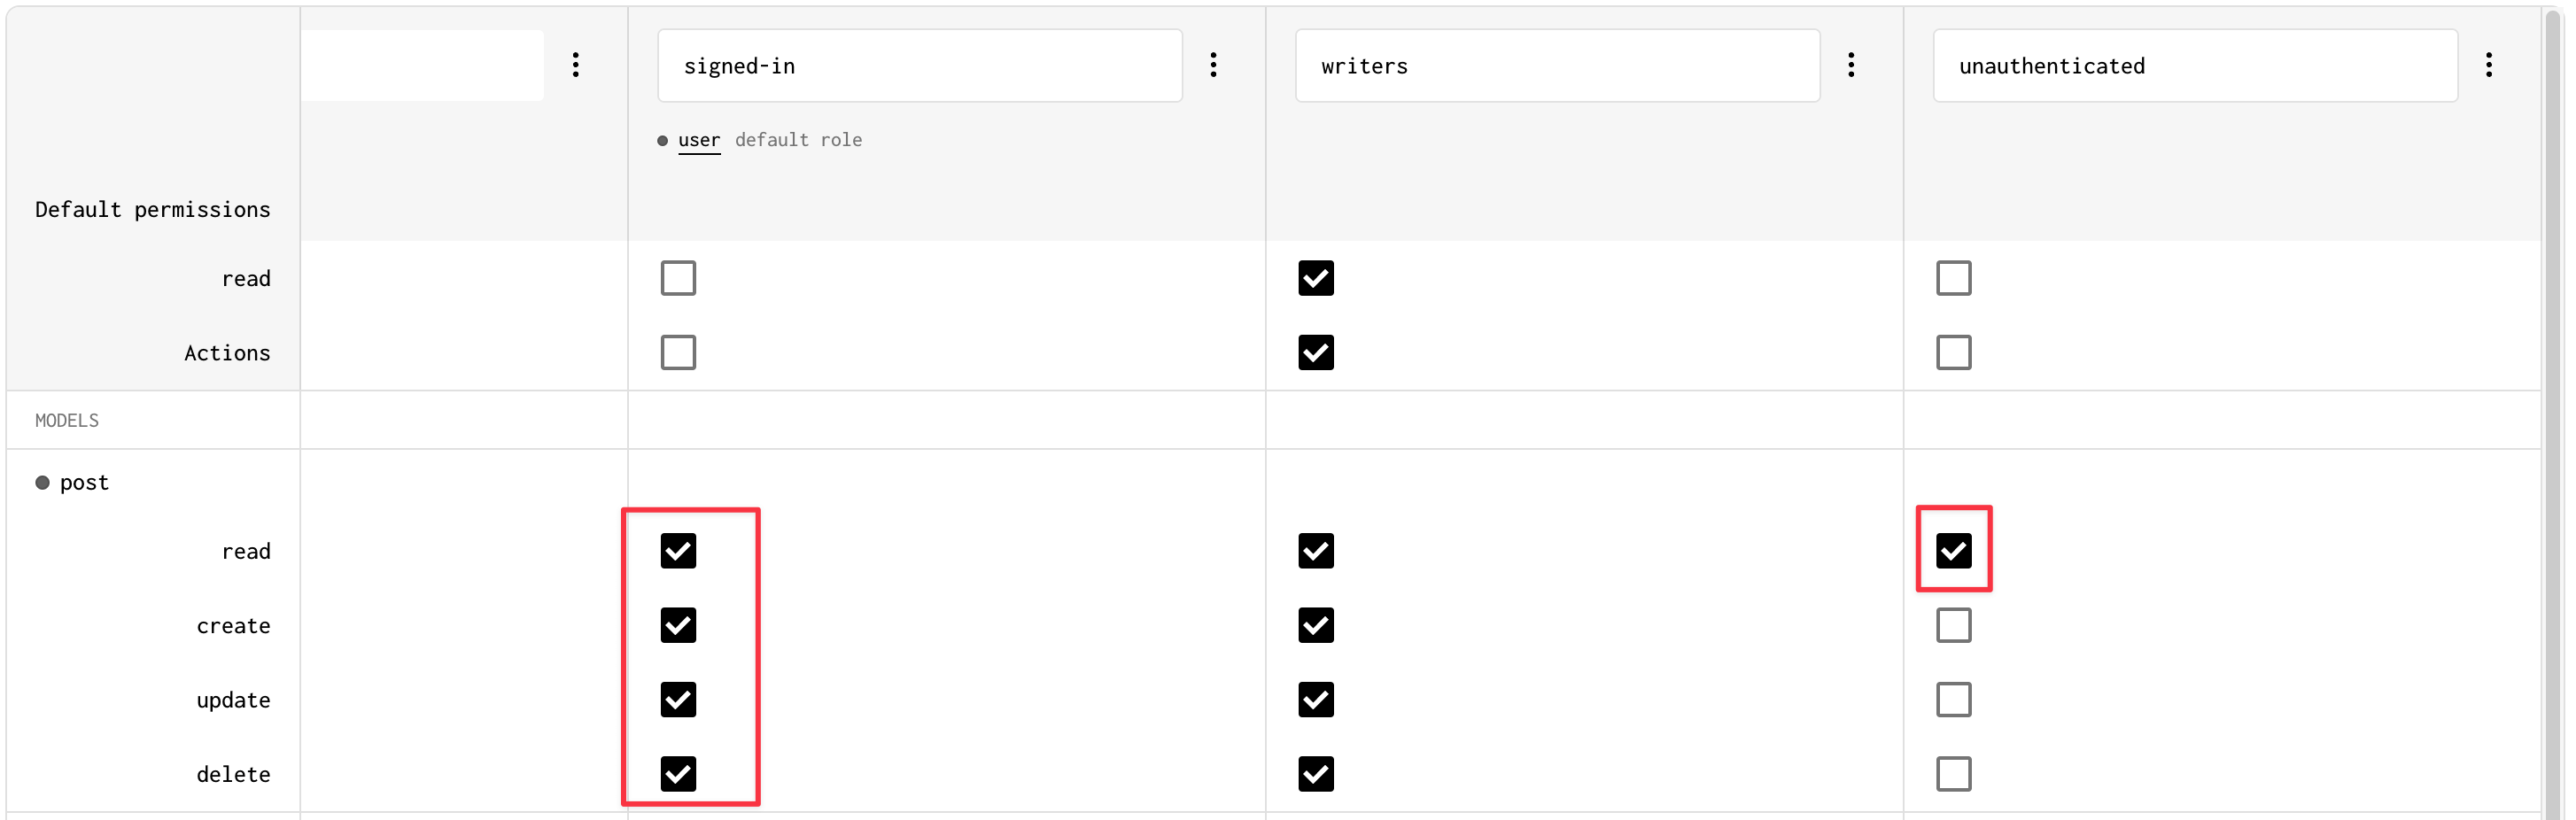
Now <inline-code>signed-in<inline-code> users will be able to read, create, and update blog posts! This tutorial does not cover the deletion of posts, but you could also set that permission if you wish.
Finally, let's make sure that <inline-code>unauthenticated<inline-code> users can only read published blog posts. We can do this by adding a custom Gelly filter to the post model:
- Hover over the read action permission for the post model under the unauthenticated role and click the + Filter link that appears
- Enter published for the file name, and a new Gelly file will be created for us at <inline-code>post/filters/published.gelly<inline-code>
- Add the following Gelly filter to the file:
This Gelly snippet filters results returned from any read action called on the post model by unauthenticated users against the <inline-code>isPublished<inline-code> field on post. This means that only published blog posts will be returned to unauthenticated users.
What is Gelly? Can I eat it?
Gelly is Gadget's data access language, a superset of GraphQL that allows us to make queries (or in this case, filters!) against the database. For more info on Gelly, check out our docs!
Our API permissions are set, now we can build our frontend!
Step 4: Install npm packages
Now that we have our data model and API permissions set up, we can build our frontend. Gadget is built on Node.js, so we can install npm packages like we would in any other Node project. Let's start by installing our dependencies.
Our frontend will make use of the Chakra UI component library to handle layout and styling, chakra-ui-markdown-renderer + react-markdown + react-rte to help us display and edit blog post content. To install these dependencies, we will use the Gadget command palette:
- Open the Gadget command palette using P or Ctrl P
- Enter > in the palette to allow you to run yarn commands
- Enter the following snippet and click Run... (or press Enter on your keyboard!):
The packages will be installed for you. You can view and edit these dependencies inside your project's package.json file like you would with any other Node project.
Now that we have our dependencies installed, let's start building our frontend!
Set up ChakraProvider
Before we get into building out our routes, pages, and components, we should set up our ChakraProvider. This will allow us to use Chakra UI components in our app.
- Open <inline-code>frontend/main.jsx<inline-code>
- Import the ChakraProvider component from <inline-code>@chakra-ui/react<inline-code>:
- Wrap your App component with the ChakraProvider:
Step 5: Set up frontend routes
Finally, we can start building our frontend! The first thing to put together is our frontend routing and we will use react-router-dom to manage this. We will have two routes in our app: the root route / where anyone can read blog posts, and a route for logged-in users to write and publish blog posts at /admin.
We will make use of Gadget's <inline-code>@gadgetinc/react<inline-code> package to help make requests to our backend and handle authentication. This package has a suite of useful hooks and components we can use to protect routes behind authentication and make requests to our backend.
Gadget currently supports authentication via Google's OAuth 2.0 client. When you start building, you can use Gadget-supplied credentials so you don't need to worry about setting up an OAuth Client in the Google Cloud Console. The default frontend app has a sign-in button and a UserCard component which will allow you to test out the default authentication flow and gives you a taste of what using the useUser hook looks like. We will use these default credentials to build and test, but you will need to set up your own OAuth Client in the Google Cloud Console to use auth in production.
We can open <inline-code>frontend/App.jsx<inline-code> to set up our required routes:
- Replace the existing router component with some placeholder DOM elements:
The <inline-code>SignedInOrRedirect<inline-code> component can be used to protect routes, and will redirect unauthenticated users to the route defined in <inline-codesignInPath<inline-code>.
Right now, our routes are set up to render some placeholder DOM elements. You can preview your app by:
- Clicking on the app domain name at the top of the left nav bar
- Hovering over Go to app and clicking Development
We just see a page with a header, the default app background, and the word "blog" displayed. This probably isn't the blog content we want to display, so let's go ahead and replace this with a proper navigation component so we can route to our blog posts and admin pages.
Update the Header component for navigation
The default Gadget template gives us a <inline-code>Header<inline-code> component that we will modify. The <inline-code>Header<inline-code> is already included in our app, and the component is found in <inline-code>frontend/App.jsx<inline-code>.
Right now, the <inline-code>Header<inline-code> displays a sign-in or sign-out button, as well as our app name. We want to include some clickable links for our blog and admin routes, so let's update the <inline-code>Header<inline-code> component to include these links. We also want to use Chakra UI to change the style of the <inline-code>Header<inline-code>. The whole code snippet will be posted first, with details following.
- Delete the <inline-code>frontend/App.css<inline-code> file from your project, and remove the App.css import statement from <inline-code>frontend/App.jsx<inline-code> and <inline-code>frontend/routes/index.jsx<inline-code>
- Replace the import statements at the top of <inline-code>frontend/App.jsx<inline-code> with the following to import additional React hooks and Chakra UI components:
- Replace the <inline-code>Header<inline-code> component in <inline-code>frontend/App.jsx<inline-code>:
There are a couple of important things to pay attention to in the <inline-code>Header<inline-code> component, most notably the hooks and components imported from <inline-code>@gadgetinc/react<inline-code>:
- We use the <inline-code>useUser<inline-code> hook to get the current user's information. This hook will return an object with the current user record. We use this hook to display the user's profile picture in the navigation bar.
- We use the <inline-code>SignedIn<inline-code> and <inline-code>SignedOut<inline-code> components to display different content depending on whether the user is signed in or not. In this case, we display the "Admin" link and "Sign out" button if the user is signed in, and the "Sign in" button if the user is not signed in.
We can test out sign-in and sign-out now. When we sign in, we automatically redirect to the admin page and we can see an Admin link in the nav bar. Clicking on the Blog link in our header should change the placeholder text from "admin" to "blog", which means our router is working. Sign out, and you should be redirected back to the "blog" page.
Step 6: Build a page to display blog posts
Now that our router is working we can focus on building pages for reading and writing blog posts. Let's start with a page for reading blog posts.
Start by building a page that will display posts to unauthenticated users. This page will be the root route <inline-code>/<inline-code> and will display a list of blog posts.
- Paste the following code into <inline-code>frontend/routes/index.jsx<inline-code>:
Most of this file is ordinary React state and component code! There are some Gadget-specific things to pay attention to:
- We use the <inline-code>useFindMany<inline-code> hook to fetch all the posts from the database. This hook will return an object with a <inline-code>data<inline-code> property that contains the posts. We use this hook to display the posts in the blog, and a <inline-code>useEffect<inline-code> hook is used to update the state when the posts change. The posts are sorted by <inline-code>updatedAt<inline-code> in descending order, so the most recently updated posts will be displayed first. We also use the <inline-code>fetching<inline-code> and <inline-code>error<inline-code> properties to display a loading indicator and an error message if the posts are still being fetched or if there was an error fetching the posts.
One more step until we can see our blog posts - let's hook up this page to our router in <inline-code>frontend/App.jsx<inline-code>:
- Import our route component into <inline-code>frontend/App.jsx<inline-code>:
- Replace the placeholder "blog" div components with the imported Index:
Now if we check our development app, we should see... a message that tells us we haven't created any posts yet.

That's a bit anti-climatic. Let's fix that next.
Step 7: Build an admin page to write blog posts
This is the last major step in building our blog. We'll build a page that authenticated users can use to write blog posts. This page will be at the <inline-code>/admin<inline-code> route.
- Create a new file <inline-code>frontend/routes/admin.jsx<inline-code>
- Paste the following code into <inline-code>frontend/index/admin.jsx<inline-code>:
This file is a bit longer than the other files we've written so far, but it's still mostly ordinary React code. There are a few Gadget-specific things to pay attention to:
- We use the <inline-code>useUser<inline-code> hook again to get the currently logged-in user. In this case, the user record is used to link new blog posts with the author
- The <inline-code>useFindMany<inline-code> hook is also used again to fetch all the posts from the database. We use this hook to display the posts in the "Publish" tab, and a <inline-code>useEffect<inline-code> hook is used to update the state when the posts change
- The <inline-code>useAction<inline-code> hook is new to this app, and we use it to create new blog posts and update existing ones. The <inline-code>addPost<inline-code> action is used to create new posts using the <inline-code>api.post.create<inline-code> action, and the <inline-code>changePublishState<inline-code> action is used to update the <inline-code>isPublished<inline-code> field of existing posts using our <inline-code>api.post.update<inline-code> action
Once again, let's hook up this page to our router in <inline-code>frontend/App.jsx<inline-code>:
- Import the admin route component into <inline-code>frontend/App.jsx<inline-code>
- Replace the placeholder "admin" div component with the imported Admin:
And we're done building our app! Let's check it out in the browser and write a blog post! Once you have a post written, you can publish it by toggling the switch in the "Publish" tab.
Try logging in and out, and different publishing states to test out the experience for both signed-in and unauthenticated users. See the video at the start of the tutorial for a demo.
Step 8 (Optional): Deploying toProduction
If you want to publish your blog app to Production, you'll need to supply your own Google OAuth credentials. Read our documentation on how to set up credentials.
Finally, deploy your app to Production:
- Click the Deploy button in the bottom right corner of the Gadget editor
- Click the Deploy to Production button in the modal that appears
Your app will be bundled and minimized for production, and deployed. Preview your production app by:
- Clicking on your app name in the top left corner of the Gadget editor
- Hovering over Go to app and clicking Production
Next steps
Interested in building apps using OpenAI's API? Check out our OpenAI tutorial to learn how to use Gadget's some of Gadget AI tooling, including the OpenAI connection, vector embeddings, and response streaming.
Questions?
If you have any questions, feel free to reach out to us on Discord to ask Gadget employees or the Gadget developer community!


