How to: Integrate Shopify and Airtable using Gadget
In this tutorial, we'll explore the process of integrating Shopify with Airtable using Gadget. This integration will allow you to seamlessly transfer and manage product data from your Shopify store into an Airtable instance. We'll only cover a one-way synchronization, meaning data will flow from Shopify to Airtable.
Requirements
To get the most out of this tutorial you will need:
- A Shopify Partner account
- A Shopify development store with some product data
- An Airtable account
- An Airtable table set up to store Shopify product data
Prefer a video? Check out our webinar replay:
Step 1: Setting up your Gadget app and Shopify connection
Create a new Gadget app
To begin, create a new Gadget app at gadget.new.
- Choose the Shopify app setup
- Provide your app with a domain name, for example, airtable-webinar
- Click Get started
This will set up a Gadget app with a hosted and auto-scaled PostgreSQL database, Node.js backend, and a React frontend, powered by Vite.
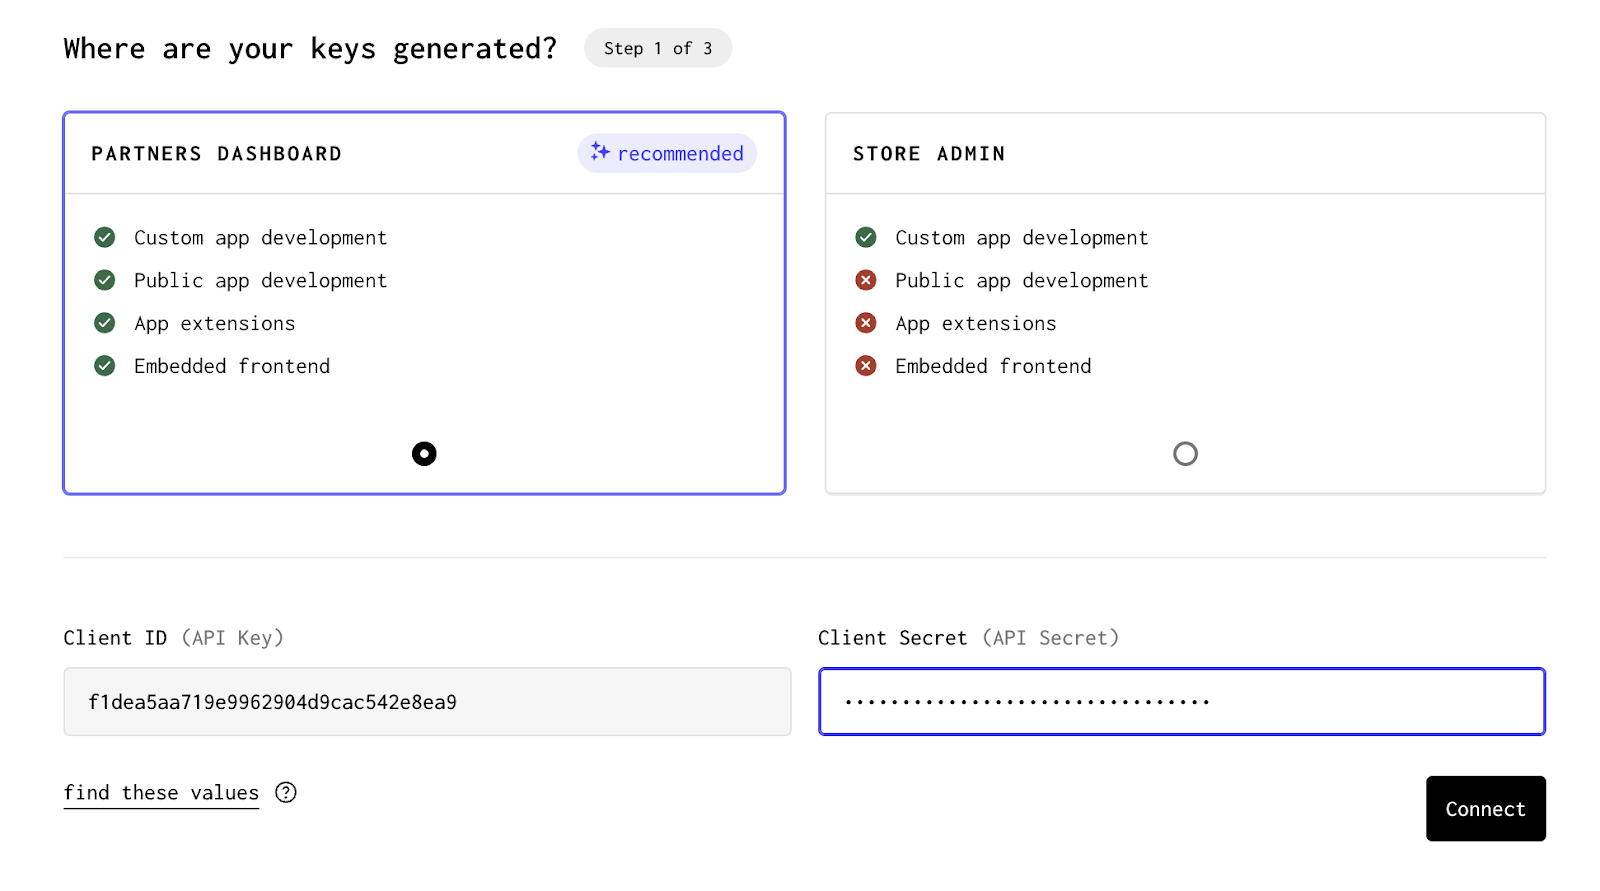
Connect to Shopify
Click on the Connect to Shopify button in Gadget and open up the Shopify Partner Dashboard. We recommend always connecting through the Partner Dashboard, so you have the flexibility of building Shopify app extensions for custom and public app development.
- Create a new app manually in the Partner Dashboard
- Copy the Client ID and secret from your new Partner app back to Gadget
- Click Connect in Gadget to continue setting up the connection
Choose Shopify API scopes and data models
On the Setup Shopify connection page, select the Shopify API scopes and data models you want to include in your app.
- For this example, we'll work with product data, so we'll choose the Products Read scope
- Then select the Product data model
- Click Confirm to continue with the setup
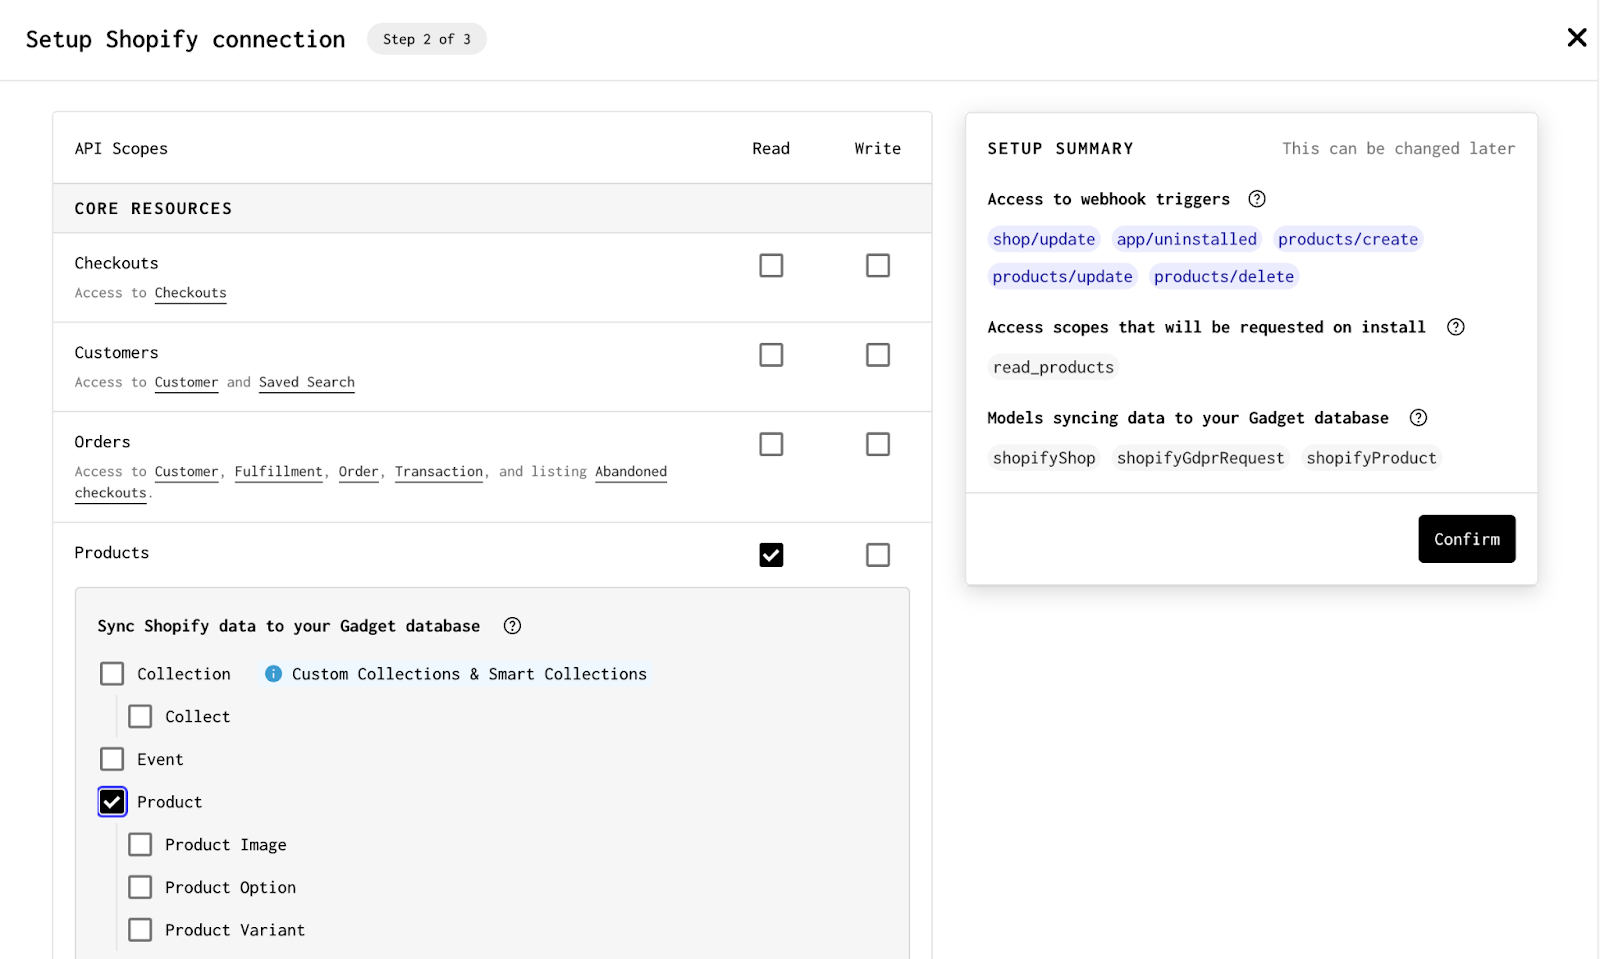
This will automatically subscribe your app to incoming Shopify product webhooks, and allows for a data sync to be run that will pull in all historical product data.
If you’re building your own app, you can edit this connection at a later time to select different scopes and data models.
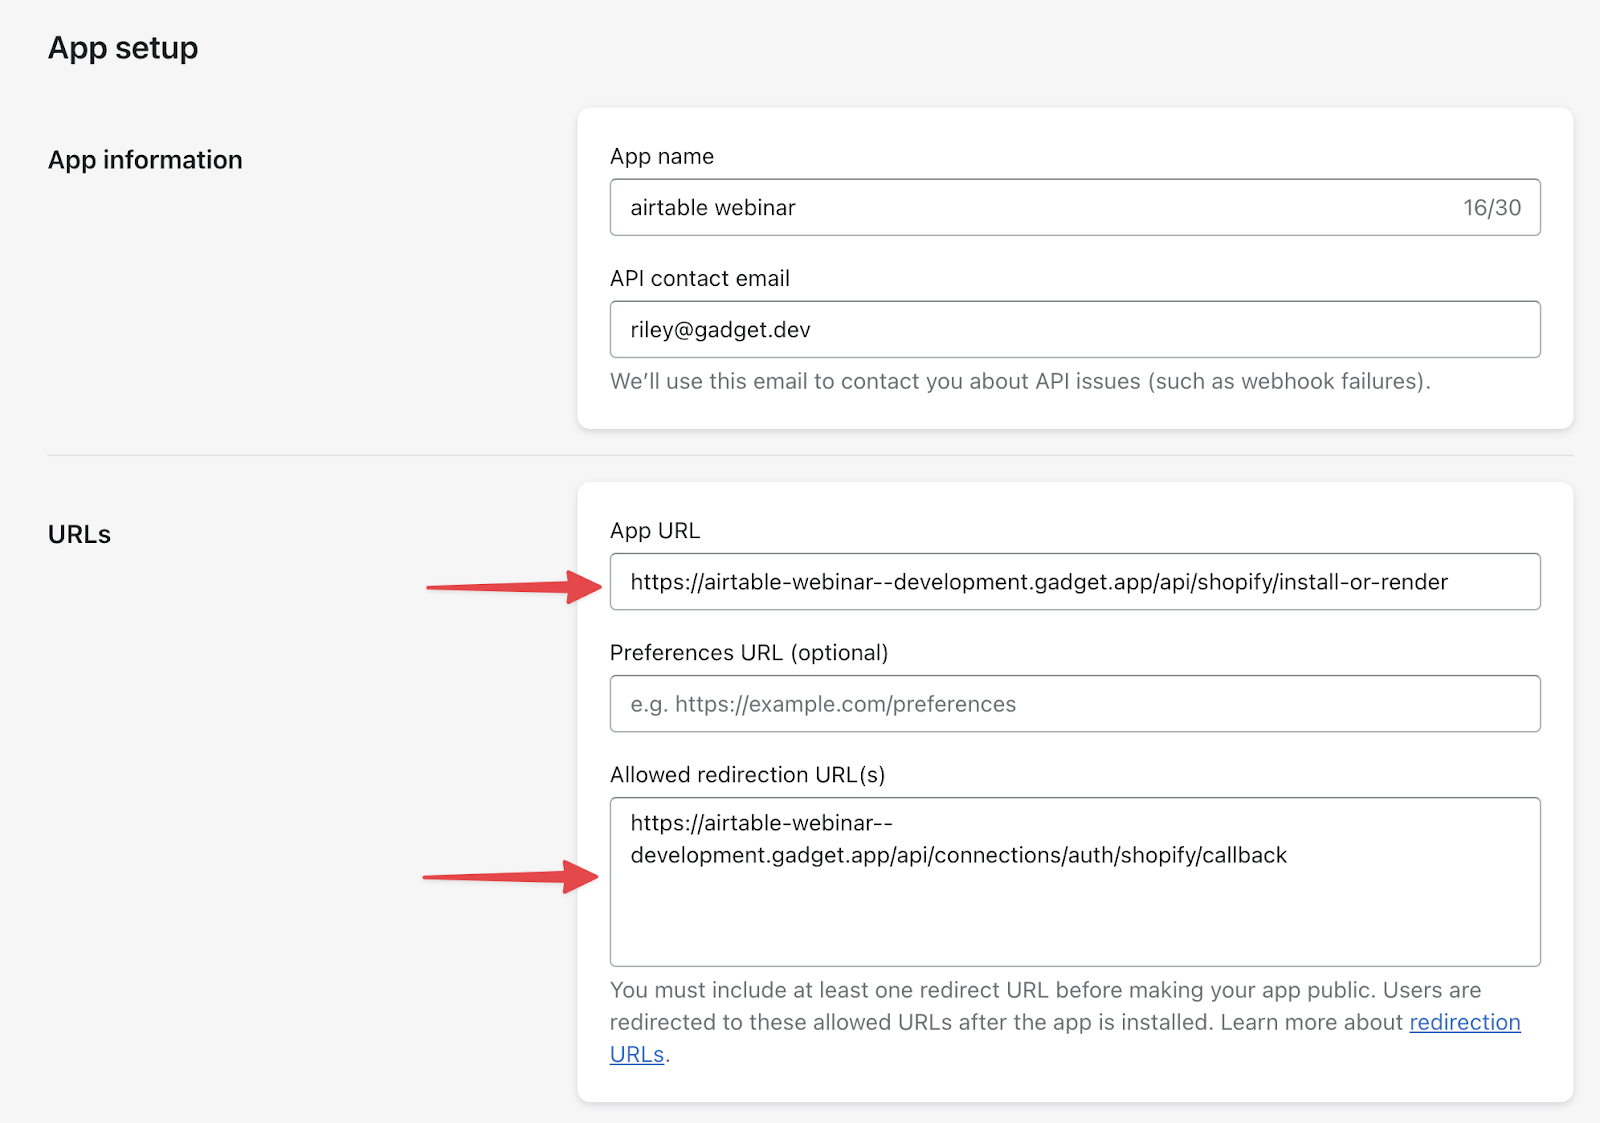
Set up Partner app URLs
Your Gadget app gives you an App URL and Redirection URL that need to be copied back to the Shopify Partner app.
- In the Partner Dashboard, navigate to the App setup tab
- Copy the App URL from Gadget to your Partner app
- Also copy the Redirection URL from Gadget to your Partner app
- Click Save in your Partner Dashboard
Install on a store
The Shopify connection is almost complete! The last step is installing on a Shopify development store.
- Navigate to your Partner app’s Overview page
- In the Test your app section, click Select store
- Select a store - Shopify will redirect you to an installation page
- On the Installation page, click Install app

Gadget handles all of Shopify’s OAuth for you, so your Gadget app is instantly installed on your development store. The app you are redirected to is a React frontend, running as part of our Gadget project. We can see the file powering this experience in <inline-code>frontend/ShopPage.jsx<inline-code>
We have already:
- Subscribed to Shopify products webhooks
- Managed Shopify OAuth and session tokens
- Handled Shopify’s App Bridge setup
- Installed Polaris 12 with a sample app frontend
Now we can start writing our business logic. In our case, this means forwarding Shopify product data to Airtable.
Step 2: Connecting to Airtable
Install the Airtable NPM client
Because Node.js is used to power Gadget app backends, we can install and use npm packages like we would in any other Node project.
- Open the Gadget command prompt by clicking on it at the top of your web editor
- Enter <inline-code>><inline-code> to enter command mode
- Type <inline-code>yarn add airtable<inline-code> to install the Airtable client
This client will be used to forward Shopify data from Gadget to Airtable. Once installation is complete, you can see it installed in your project’s <inline-code>package.json<inline-code> file.
Configure your Airtable client
Now we use this package to set up our Airtable JavaScript client that can be used in our custom code.
- In the root of your Gadget app’s file explorer, create a new file called <inline-code>airtable.js<inline-code>
- Paste the following code:
We need an Airtable personal access token, base ID, and table ID from Airtable, and will store these values as environment variables in Gadget.
Set up environment variables
Once we have our access token from Airtable, and know how to get your base ID and table ID, we can store these as environment variables in Gadget.
- In Gadget, click on Settings in the nav bar
- Click Environment Variables
- Click + Add Variable to add a new variable
- Name this variable <inline-code>AIRTABLE_ACCESS_TOKEN<inline-code>
- Paste your access token in as the value for the Development environment
Repeat these steps to create <inline-code>AIRTABLE_BASE_ID<inline-code> and <inline-code>AIRTABLE_TABLE_ID<inline-code> environment variables.
With environment variables set up, we can use our client to forward data to Airtable. We need to modify our <inline-code>shopifyProduct<inline-code> data model, and then we can write our custom code.
Step 3: Adding an airtableId to the shopifyProduct
We need to store an ID field on our shopifyProduct records so we can update and delete existing records in Airtable. Clicking on the <inline-code>shopifyProduct<inline-code> data model in Gadget shows you all of the fields that are included in the model. We can also add custom fields to this model.
- Click on <inline-code>shopifyProduct<inline-code> in the DATA MODELS section
- Click + in the FIELDS section to add a new field to the model
- Give this model the API identifier <inline-code>airtableId<inline-code>
Leave the field type as <inline-code>string<inline-code> and with that, we are ready to send data to Airtable.
Step 4: Creating new products in Airtable
When Gadget imported the <inline-code>shopifyProduct<inline-code> data model, it also set up CRUD actions automatically. These actions are triggered by Shopify webhooks or a historical data sync.
The create, update, and delete actions are all editable code files. By default, they simply store incoming data from Shopify in your Gadget app’s database. We are going to extend these default actions to also forward data to Airtable.
- Click on <inline-code>shopifyProduct<inline-code> in the DATA MODELS section of your Gadget nav
- Select the <inline-code>create<inline-code> action - this will open the code file that we will edit
- Paste the following code into the create action code file <inline-code>shopifyProduct/actions/create.js<inline-code>
This file:
- Imports the Airtable client we previously set up
- Stores the incoming product data in Gadget’s database (in the run function)
- Uses the Airtable client to forward product data
- Updates the shopifyProduct record with the <inline-code>airtableId<inline-code>, using the Internal API
- Logs data and responses using the <inline-code>logger<inline-code>
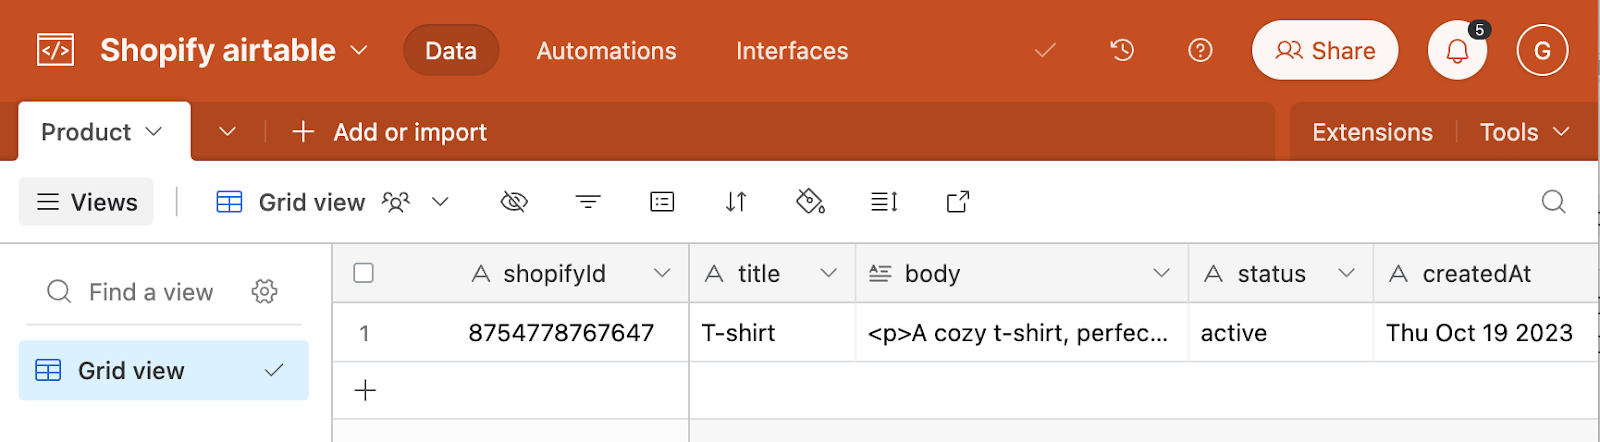
To test that this works correctly, try creating a new product in your Shopify development store. Shopify will fire a webhook, Gadget will run the <inline-code>create<inline-code> action and custom code, and the product record should appear in Airtable.
You can also click on Logs in Gadget to see the logging statements written by the above code snippet.
Now we can handle product updates and deletes.
Step 5: Updating and deleting products in Airtable
The process for updating and deleting product data in Airtable is similar to creating new products. We will use the Airtable client to update or delete a record using the <inline-code>airtableId<inline-code> field stored on the <inline-code>shopifyProduct<inline-code> model.
Updating shopifyProduct data in Airtable
Paste the following code into the update action of the <inline-code>shopifyProduct<inline-code> model:
This file will run every time your app receives a product update webhook from Shopify, and:
- Updates the stored data in your Gadget database
- Uses the Airtable client to update product info stored with <inline-code>airtableId<inline-code>
- Logs information to Gadget’s logging tool
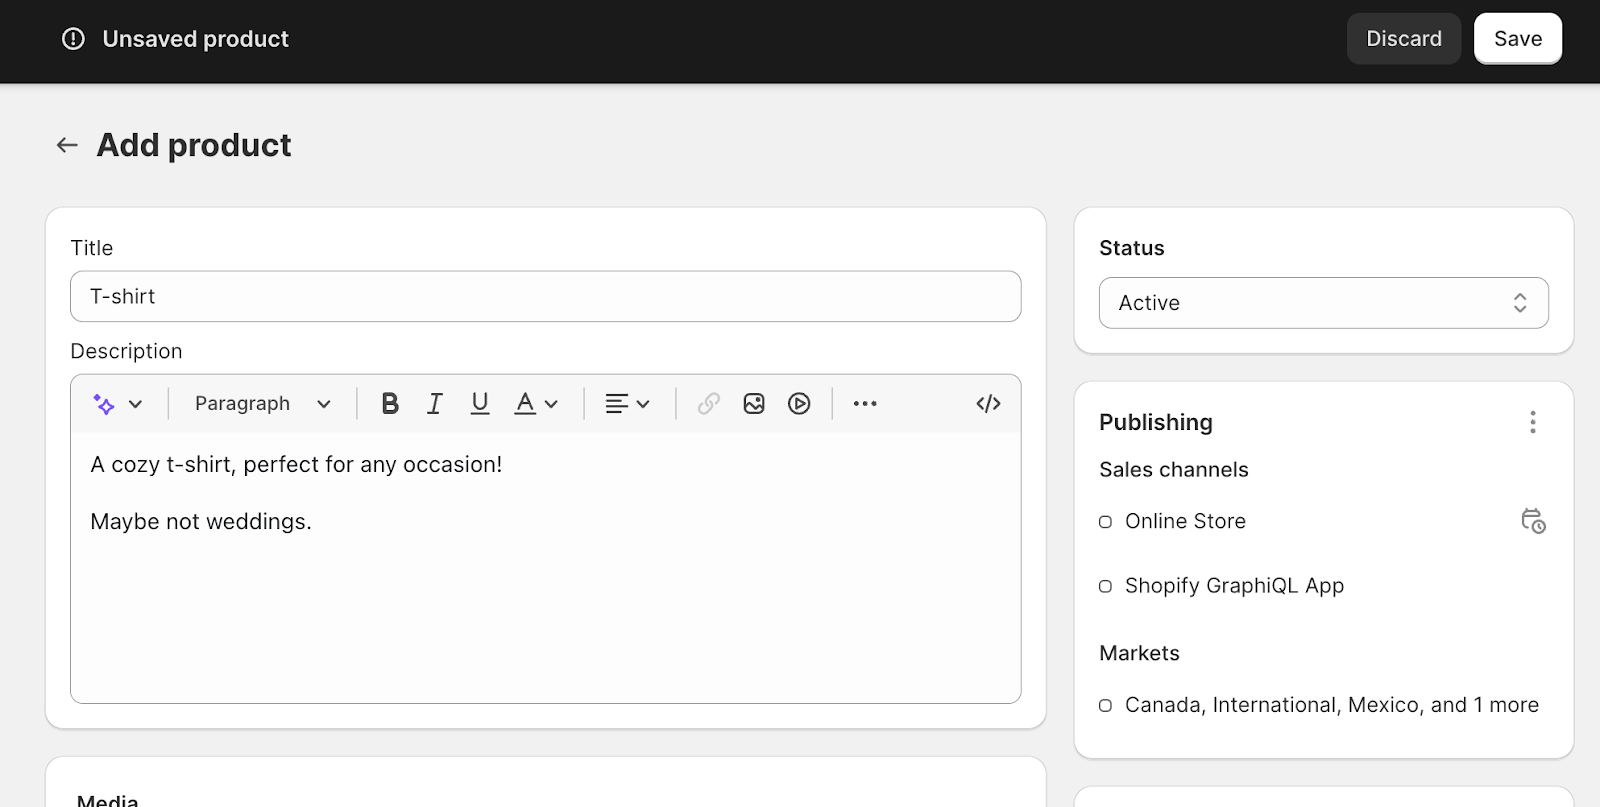
You can now test this code. Edit product information, such as the description, for a product already stored in Airtable and notice that the changes are forwarded to the Airtable record.
The last step is handling product deletion.
Deleting shopifyProduct data in Airtable
Paste the following code into the <inline-code>delete<inline-code> action for the <inline-code>shopifyProduct<inline-code> model to delete records when a product delete webhook is fired by Shopify:
This file:
- Deletes the product stored in the Gadget database
- Uses the Airtable client to delete the record stored at <inline-code>airtableId<inline-code>
- Logs information to Gadget’s logging tool
To test this out, delete a product in your Shopify store that has already been forwarded to Airtable. You should see the record deleted in Airtable.
And we are done! We are now successfully keeping an Airtable table in sync with Shopify product data.
Managing the connection
Airtable has a rate limit of 5 requests per second. If you want to run Gadget’s built-in historical data sync, you will be able to send data to Airtable as fast as Shopify’s rate limits allow. This is too quick for Airtable.
You can use a queueing service such as Google Cloud Tasks to accommodate Airtable’s API rate limits. We will cover set-up instructions in Part 2 of this tutorial, coming soon.


